
Do-it-yourself country house economy option. DIY garden houses
Nowadays, most people in the warm season want to live in nature. Breathe clean air, temporarily getting rid of the atmosphere of a noisy smoky metropolis and constant stress - the dream of many citizens. Some have been collecting the necessary amount for construction for years. capital house in the country. But in order to move to nature, it is not at all necessary to wait until you have the right amount of money. A garden house can turn out to be comfortable temporary housing, it will not take much time to build it, it will cost inexpensively and it will be very pleasant to live in it in the summer. It is realistic to build a garden house with your own hands, you need to choose the right project, material, and decide on the price.
A budget version of a garden house can be built from timber or using Finnish frame-panel technology. These are buildings of the same type, only during construction log house it is sheathed with timber (profiled or simple), and frame house sheathed with chipboard, plywood or fiberboard.
garden houses according to Finnish technology - a good solution for a summer cottage. For a lightweight structure, a massive foundation is not required; the frame is quickly sheathed with a finishing material.
Plywood frame garden house
It takes less time to build such a house than a log house, because. large sheets of plywood, which are used for sheathing, are attached to the frame much faster than beams. Such a house can be built even in a week, and it will look presentable, especially if you use a lining made of wood for cladding.

Beautiful plywood garden house - decorative chimney trim, brightly painted walls, openwork porch and bituminous tile roof. A house can look aesthetically pleasing without wood paneling.

Construction stages:
- Installation of foundation supports.
- Erection of the frame: work on the upper and lower skin, erection of vertical supports and rafters. For the installation of doors and windows, contours are formed using additional bars.
- To create a draft version of the floor, thick boards are used - 20 cm thick or more.
- The outer skin of the frame is plywood, self-tapping screws are used for fastening. For inner lining drywall, plywood, fiberboard or chipboard are used. Nights in spring and even summer are sometimes quite cool, so it is advisable to warm the house. To do this, a layer of mineral-cotton insulation can be laid between the layers of the skin.
- Installation of a clean floor - floorboard or linoleum.
- Sheathing with plywood rafters. The plywood is then covered with a layer of drying oil and ruberoid.
For your house to be beautiful, it needs exterior cladding made of solid material. For example, siding or wooden lining. Windows in country house you can install both plastic and wooden ones, this is a matter of taste. But plastic is easier to maintain, and such windows will last longer.
You can also build a garden house with your own hands from a bar. This is the most commonly used material for country houses. The beam looks aesthetically pleasing, and the construction of this material can last a long time. In construction, you can use a simple and profiled timber. In the latter case, the assembly of the house resembles a designer, because. the connection of the elements is due to the tongue-and-groove system. country houses today many companies offer from profiled timber, all the elements of such a house are already ready, they only need to be assembled.
Construction of a garden house from a bar
First of all, as usual, we make the foundation. It can be both columnar and tape. A columnar foundation is suitable if the size of the house is small. For the foundation, you can also use concrete slabs, they are laid on a well-compacted layer of sand, deepening into the ground by about 15 centimeters. After the foundation has been erected, a waterproofing layer should be laid on it, roofing material will do.
After the foundation is made, the frame is installed. The crown and logs (lower strapping made of timber) are laid on the foundation supports, then installed vertical supports from the same material.

The frame of a garden house made of timber is built in a short time, while the building is quite strong and durable.
If you like a garden house with a veranda, the lower logs are extended to its intended length, mounted on additional supports. Thick boards are used to create the floor, as in the version described above. After installing the floor, we assemble the walls from the timber. Pins are used to fasten the joints; after a layer of sealant, a new crown is laid out on the finished row. A sealant is needed for each layer; jute or tow can be used.
Then we equip the roof. Installation of braces and rafters from a bar. The next stage is sheathing with timber and laying a layer of roofing material. After that - the final work on the floor. The wooden floor is covered with thermal insulation (mineral wool layer). Glassine can be used as a hydro- and vapor barrier. As a floor covering in a country house, a thick linoleum or floorboard is suitable. The house will look very attractive if the bars are sheathed with siding or wooden clapboard on the outside. Now you can move on to installing windows and doors and think about how you want to see the interior of your country house.
Interior design of a garden building
The interior of a garden house made of timber is good in itself - the walls and floors sheathed with wood look great, so the design of the garden house inside can be done in a minimalist style - the necessary furniture, a minimum of accessories, the general background is wood paneling.

The interior of the garden house in a minimalist style. Walls, floor and ceiling - wooden paneling, a minimum of furniture and decor in the form of green plants and a couple of paintings
Wood goes well with natural stone, so you can make a tabletop out of sandstone, lay out part of the wall. On the veranda, in combination with wood, forging elements will look harmonious.

The veranda of a garden house made of timber, where wood, forged lamps and natural stone are perfectly combined, with which the wall, table and brazier are lined
The rustic style is also suitable for the design of a garden house inside - use patchwork, checkered fabrics and curtains, earthenware, rough wooden furniture, dry bouquets, if you like country style.
If the house is sheathed with plywood or drywall from the inside, the dwelling can be given an urban look - paste over the walls with wallpaper or paint, cover the floor with a carpet.

Urban style garden house interior, 2 in 1, bedroom and office
Examples of planning garden houses
The plan of a garden house should be simple - it is a building of a small area, usually with one, maximum two living rooms, a kitchen, a small bathroom, an entrance hall / pantry and a veranda, if it is provided for by the layout.

Comfortable garden house made of timber with a veranda and its layout

Little garden cottage - frame structure from a bar with a slate roof. Consists of a veranda, a bathroom and a living room

A small garden house consisting of two rooms, a bathroom and an entrance hall
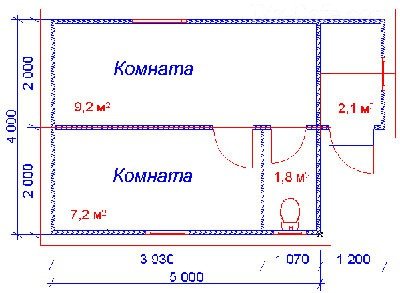
Plan of the building shown above
The area of \u200b\u200bthe soda house that you see in the photo is only 7.5 square meters. m.
But this is by no means an ordinary shed for tools: it can easily be used both as a pavilion for guests, and as a spacious summer kitchen or creative workshop. Do you want one? Realize your dream!
Garden houses, summer kitchens, etc. are considered outbuildings, more precisely, "structures of auxiliary use", and not objects of capital construction. For their construction on a personal plot, most likely, you will not need to obtain permission (there are exceptions, check with the municipality, in the architectural department). However, no one canceled the requirements of SNiPs, including those related to fire safety, and sanitary and household standards.
The most correct thing for such a house is to find a place in the depths of the site, then no one will come to you with claims. In any case, from it to the border with neighbors there should be at least 1 m, and to the fence from the side of the street - at least 5 m.
Construction kit for building a garden house
Decided to buy a garden house-constructor? And again you have to make a choice. The market now offers three options for building systems for building garden houses.

Frame garden house. The main bearing function is performed by four racks (they must be securely concreted into the foundation using H-shaped anchors). Profiled boards or bars, from which the walls are assembled, are either inserted into the grooves of the racks, or nailed to the racks and strapping beams.
Panel (panel) garden house. In this case, the house looks like a card house. Each wall-card is a shield (panel) - a wooden frame with sheathing. Sheathing can be made of sheet material (for example, OSB sheets) or from boards (lining) connected to a tongue and groove. The panels have already been made, where necessary, window and door openings. The walls are connected by screwing the frames through to each other.
"Log cabin" (block, type-setting, crown). Profiled boards or bars with cuttings are connected to each other crown by crown - just like a regular log house. The tongue and groove connection provides wind protection.
The main dimensions of the garden house
Plinth dimensions in plan: 3 x 2.5 m External dimensions of the house, including roof overhangs: 3.5 x4.03 m Wall thickness: 28 or 45 mm Side wall height: 1.95 m Ridge height: 2.54 m
Building a garden house step by step
Here we will show the process of assembling a house, the building kit of which consists of crowns - thick profiled boards with pre-cut cuts for corner joints. Nothing complicated, the main thing is to be patient, diligent and methodical.
![]()

1
. In this case, the house is being built without a foundation, on a site of paving slabs. On a site where clays and loams predominate, a foundation is needed.
2
. Now the house will grow quite quickly. The walls are evenly built up to the seventh crown in the wall of the main facade.
3
. The fully assembled door is inserted into the opening in the wall. The threshold of the door frame at the bottom should fit snugly.
4
. The door frame must be precisely aligned horizontally and vertically with the help of precise blows with a rubber mallet.
5
. The next step is to continue assembling the main facade from short boards. After the third row - installation of the finished window by analogy with the door.
6
. The roof canopy rests on elongated wall boards. That's why importance has a sequence of stacking elements.
7
. Installation of gables (they are the same). There is a small gap above the door and window.
8
. Installation of rafters. For accurate alignment of the roof boards, a cord must be pulled.
9
. The last board must be fitted to the rafters. Finally, both edges of the roof overhang are installed.
10
. The roof can be quickly covered with two layers of roofing material or shingles to protect the house from rain.
11
. The last step in assembling the "box" of the house house is the installation of wind boards. In principle, the construction work is completed, you can start finishing.
On the site with low level groundwater horizon and strong, non-porous soils, it is likely that you will not have to build a foundation for easy construction. But it is still necessary to prepare the foundation. To begin with, from an area equal to the building area, the sod should be removed and a recess made in the ground, which should be filled in layers with gravel and sand. The depth of the excavation, the size of the gravel, its strength characteristics (as well as the characteristics of the paving slabs that will be laid on top of the gravel) are determined by the conditions of the site and the weight of the building. In this case, the recess is 30 cm deep.


1
. Gravel and sand were compacted in layers with a manual rammer, and the surface was leveled with a rule. The paving slabs were laid, the elements were corrected with a sedimentary hammer.
2
. From the film (in this case, we used the one in which the wooden parts of the building kit were packed), cut 5 strips - according to the dimensions of the support bars.
3
.Strips should play the role of waterproofing. They were nailed to the support bars to prevent moisture seeping from the base up the structures.
4
. Then the boards of the first crown of the wall “box” were connected, laid and screwed to the support bars.
5
. A piece of tongue-and-groove board can be used as a cleat when knocking down corner joints.
6
. The tongue-and-groove floorboards were nailed to the foundation beams, starting from the front wall.


Untreated softwood first of all needs antiseptic impregnation to protect it from decay, fungus and pests. What color to paint the house?
From an aesthetic point of view, it is correct to focus on color scheme and the style of the main building on the site - a residential building.
1
. The ends of the wooden parts were impregnated with an antiseptic especially carefully.
2
. The windows, door frame and roof overhang were painted with white exterior paint.
3
. After the white surfaces had dried well, they were carefully sealed with masking tape.
4
. The fittings were dismantled before painting so as not to get dirty.
5
. The window sashes were simply slid onto small plastic studs from which they could be easily removed for painting on both sides.
6
. All surfaces were painted twice. So the protection is more reliable, and the color is more even.

Bed and breakfast for friends
The summer guest house is a great idea. Kind of an outbuilding. Of course, in the summer you can get by with a garden shower or freshen up right from the watering hose, but there is no real bath in the garden house. Instead, you will be able to offer your guests a real romance - an overnight stay among the greenery, breakfast on the terrace with flowers from the garden and the opportunity to retire for a few hours. And your friends can take a shower in the house.
If the house is free, you can become a guest in it yourself: good book and a full coffee pot - a great start to a mini-vacation in your own garden. In the blink of an eye, you can escape from the daily routine.
Terrace for a garden house
The construction of the terrace can be postponed for a while. However, it is important to consider: the foundation under it must be the same as under the garden house, and it must be laid to the same depth, otherwise the platform and the house will live their own lives. This rule is even more significant when the terrace is glazed or simply closed from the sides to the roof, or the platform is equipped with posts on which the roof overhang rests. The following shows some of the simplest options for the base device. Whether they are suitable for you depends on the geological conditions of the site.


1
. The sequence is as follows: the sod was removed, the soil was excavated to a depth of about 30 cm. Then a layer of crushed stone 25 cm high was poured and compacted. They poured a layer of sand 5 cm - compacted again. Geotextiles were laid on top to prevent weeds from sprouting.
2
. Separate concrete slabs serve as supports for wooden logs. The joists were screwed to the slabs. The space between the slabs was filled with rubble. As a flooring, a floor board was used (as options - a terrace board or garden parquet).
W. The result depends on how carefully the gravel and sand layers were compacted and leveled. The base must be level, a slight slope is required for water to drain. (If the floor boards are not stacked closely, then the slope is not necessary.)
4
. If geological conditions allow, then a summer house can be built simply on a dump gravel-sand base. A compacted layer of crushed stone or large pebbles will serve as a support for the log. Stability will ensure the screwing of the logs to the floorboards.
5
. Another option, possible on stable soils, is home-made concrete posts with height-adjustable support-mi-anchors. It is useful when you need to compensate for a large difference in height.
6
. Finally, an option suitable if an existing site paved with paving slabs is chosen for the installation of a EASY summer house, and a terrace board or garden parquet is chosen as a flooring. It is permissible to use the "proprietary" support systems that come with this board or parquet.
Even with only initial construction experience, you can build a small garden house for household needs in a couple of weekends. And from the tools you just need a circular saw, a drill and a screwdriver.
Often, a garage is used to store the things and tools needed in the household on the site, which, because of this, turns into a dump. Here, a lawn mower, children's bicycles, skis, tools for repair and gardening are parked in the crown of the car. Do you recognize the picture? Then this interesting offer is for you!
A small building will allow you to free up a garage, and this simple garden house also has the added convenience of being equipped with two cabinets that open from the outside, designed to store gardening tools. This is very rational: the tools will be stored near the place where they are used.
Frame technology eliminates the cost of purchasing ready-made building elements and structures, allowing you to independently manufacture the front and rear walls of the house, the internal partition and two side walls from lumber. These five basic frames can be assembled by laying out the parts on a flat surface. Vertical racks and horizontal bars are connected with screws or nails. Subsequently, the frames are sheathed with clapboard. They build a house on a wooden deck or on a simple cement foundation. The rafters support the roof and take the load off the bulkhead. At the end of the work, a door is installed in the opening on the facade. Side cabinets are closed with simple lightweight doors. The roof of the house is covered with soft roofing material laid on a solid boardwalk. All parts should be made of spruce or pine wood. Do not spare money for quality material - this will extend the life of your building.
Like any construction business, erection on garden plot economic dominance should begin with the development of the project. The main dimensions you have chosen will allow you to determine the design of the building as a whole.
This, in turn, will help you select the required amount of building material and estimate the total cost of your enterprise.
As an example, here are drawings of a house with detailing of individual building elements and a general assembly in an axonometric view. If you take this design as a basis, you will need bars with a section of 58-58 and 38 x 38 mm for the frame, lining for wall cladding, as well as slats and lining of the doorway with a section of 18 × 58 mm.
A special permit for the construction of such an economic house, occupying an area not exceeding 5 mg, is not required. But still, you need to know the rules governing the placement of buildings relative to the boundaries of neighboring plots. That's why carefully choose a place for the house. Typically, such buildings are located on a flat and dry area, protected from strong winds. It is better to make the entrance to the building from the south side, then even without windows at open doors it will be light.
When laying out a site for construction, mark the position of the corner posts of the frame of the house with pegs and mark the center lines of the walls with a towline.
Despite the fact that the structure under construction is very light, it is still necessary to strengthen the soil under it. The best way is to use a cement slab, laying it on a sand cushion. If you decide to cast the slab on site, then do not forget to cement metal anchors into it, to which it will be possible to attach (directly or through support bars) the lower frame trim. It is even easier to make a columnar foundation.
For it, dig holes 50 cm deep. Pour a layer of medium-sized gravel into them and fill in the mortar. The required level of pouring of each support is indicated by the height of the formwork. And install the anchors here. After 2k hours, inspect the foundation and correct the flaws. Later, the solution will already gain strength.
Prepare all the necessary frame details in advance. Please note that the corner posts of the building rest on the foundation, while the intermediate posts of the wall frames rest on the bottom trim. Therefore, their length will be different. Having laid out the parts on a flat horizontal platform, first assemble the two end walls.
Don't make it difficult for yourself. Racks with strapping are simply connected with bolts or screws 6 x 120 mm. Don't forget to drill holes for them first. Then sheathe the walls with boards, starting from the bottom. Use galvanized nails 60 mm long for this. Exactly along the cord, cut the protruding ends of the boards with a circular saw. Facade walls differ from each other only in that there are two additional pillars of the doorway on the main facade.
Fasten the rafter legs to the upper ends of the obliquely cut frame racks. The central roof truss is reinforced with a puff. The truss assembly must be securely connected through the support bars to the upper trim of the wall frame.
Attach the internal partition by screwing 8 x 100 mm screws into the posts of the front and rear walls of the facades with a screwdriver, having previously made holes for them with a drill. Then connect with each other with the same
way all four walls. Strengthen the structure by upholstering the frame of the rear and front facade walls with boards.
Lay the middle truss truss on the upper trim of the side wall frames and, using metal corners, firmly connect them with screws through the support bars with a section of 58 x 58 mm. Nail flashings to the corner posts and lay the floor in the cabinets.
Sheathe the doorway with boards that will play the role of a door frame, and veneer. This work can be done by assembling all the prepared components, laying them out on the ground or sequentially mounting them directly in the opening. For the cabinet, nail a slat to the center post of the wall frame. Locking hecks will be attached to it. Then line the cabinet opening. To close the cabinet, it is enough to have light doors made of boards fastened with transverse bars with a section of 18 x 58 mm. Drive nails obliquely when sheathing. Doors are hung on ordinary hinges (door or window). If you will close the cabinet with a lock, you will need to pick up latches with lugs.
Assemble the roof slopes on the ground. Lay the lining on the bars and fasten the slope panels with nails. Place the bars under the boards with rafter spacing. When laying on the roof, they can be attached to the rafters through the bars with screws. However, the roof with boards can be sheathed directly along the rafters. Nail the edges of the soft roof laid on the panels with galvanized nails with large hats. Then lay the wind and cornice boards, cover the corners of the house with flashings.
Finally, saturate the wood inside and out with a rot and fungus protection agent. You can paint the house only outside. Two layers of paint or decorative azure give additional protection to the building.
Frame garden house - drawings
DIY garden house - photo

1. Pre-prepared parts of the frame - racks, bars of the lower trim, lintels, rafter beams and tightening - are assembled on a flat area into wall frames, connecting them with screws. Holes for screws are drilled with a drill.
2. The frames are sheathed with tongue-and-groove boards, rallying them with a wedge clamp. Galvanized nails are driven in with a hammer.
3. The protruding ends of the boards are cut with a circular saw.
4. The connection of racks with inclined rafters is carried out using screws wrapped at an angle to the rafter beam.
5. Put the sheathing on the front wall
along the sides of the doorway. Work starts from the bottom. The cutting of the top board is carried out locally.
6. The caps of the fastening nails are covered with plank sheathing. The cracks in the corners will hide them in the cladding boards. The first board is placed from below, stepping back from the edge of the strapping.
7. You can also connect wall panels and partitions with nails, but it is more rational to use large capercaillie screws, having previously made holes for them.
8. The door frame is inserted into the opening.
Its manufacture requires precise observance of the required dimensions. The box can be assembled on the spot or, as shown in the photo, on a flat area.
9. Installing the box and trim requires care to avoid gaps
and distortions: the door will stand on the main facade.
10. Partitions of cabinets are screwed to the walls. The cladding boards of the facade of the cabinets are brought to the edges of the frame, closing the corner and intermediate racks.
11. To assemble the door leaf, assemble its trim. The crossbars installed at the points of fastening of the loops are reinforced with short braces. Before sheathing the door frame, use clamps for screeding.
12. It is best to hang such a door on barn hinges with a long map. It is useful to additionally fix the casing of the box on the inside of the room with screws to increase the strength.
13. When installing the valve, a block of wood may be required, which is nailed directly to the wall sheathing boards.
14. The truss structure standing in the middle of the house is attached to the upper wall trim using four galvanized steel corners. This is where a cordless screwdriver comes in handy.
15. The roof is sheathed along the rafters with boards. When trimming their ends, use a cord. Sheathing starts from the bottom of the overhang.
16. We lay the bituminous roof, starting from below, roll the roll across the slope. The subsequent strips and the ridge are closed with an overlap of roofing material.
Hut over the holeOur dacha with ...
The topic of this article is the construction of a garden house with your own hands. We have to get acquainted with the main points of the construction of a very specific design - frame house with insulated walls on a columnar foundation, covered with bituminous tiles.
Design choice
Why did we choose this particular project?
- Frame walls filled with insulation provide effective thermal insulation at minimal cost. In addition, they will easily tolerate a slight deformation at.
To clarify: some alternative solutions (for example, sip panels) guarantee better insulation with greater structural rigidity.
However, when using them, the costs that the construction or rebuilding of a garden house will result in will increase markedly.
- The columnar foundation again means minimal costs with a small amount earthworks . All alternatives are more complicated and more expensive. Yes, this type of foundations has a small bearing capacity; however, the mass of the frame structure is more than small.
- Bituminous tiles, laid on a solid shield, attract with the complete absence of noise in rainy weather. Not only that: the shield under it will greatly simplify the thermal insulation work.
So let's get started.
Foundation
The construction of garden houses, like any other, begins with marking and laying the foundation.
Since the material for sheathing the wall frame will be OSB (oriented strand board), which has standard dimensions of 2500x1200 mm, it will be logical to make the length of each wall a multiple of the smaller of its dimensions: 3.6, 4.8 meters, etc.
The maximum step between the pillars should not exceed 2 meters. This applies not only to the perimeter: internal partitions must be supported by their own props.
After the position of the supports is marked, we proceed to their construction:
- We tear off pits about 50x50 cm in size and at least half a meter deep.
- We fill each of them with rubble. The height of the bedding is 20 cm.
- We ram the crushed stone with a manual rammer.
- We form a concrete pad 10 cm thick over the bedding. The concrete grade is M100. With independent mixing, you can focus on the following proportions of the materials that make up the concrete (in terms of one cubic meter):
| Strength grade | Cement M400, kg | Crushed stone, kg | Sand, kg | Water, l |
| M100 | 210 | 1080 | 870 | 210 |
| M150 | 235 | 1080 | 855 | 210 |
| M200 | 286 | 1080 | 795 | 210 |
| M250 | 332 | 1080 | 750 | 215 |
| M300 | 282 | 1080 | 705 | 220 |
- We lay out on the cement mortar columns of red brick the size of a brick or one and a half. A piece of 14 mm reinforcement is laid in the middle of the column, on which we will anchor the grillage.
Please note: the height of the grillage (and, accordingly, the pillars) must be at least +25 cm from the ground level.
The columns are displayed in the horizon due to the thickness of the seams.
From above, each column is waterproofed with two layers of roofing material.
Floor
Grillage
The material of the grillage is larch, a wood that is exceptionally resistant to decay. Cross section - 150 mm. The beam is drilled where it will sit on the anchor; in the corners, the grillage is connected in half a tree.
lags
They will be boards 50x150 mm with a step of 60 cm, placed on edge.
The lag material in this case does not have of great importance: inexpensive pine is quite suitable. Logs can be attached directly to the grillage beam with galvanized corners using galvanized self-tapping screws.
Warming
The construction of garden houses used for living in early spring and late autumn implies their insulation.
It is necessary to insulate, among other things, the floor.
- At the bottom of the lag, cranial bars are stuffed.
- They are covered with flooring from a board with a thickness of 20-25 mm.
- Above - a layer of vapor barrier.
- Then the space between the lags is filled with mineral wool.
- A waterproofing film is laid over the lags.
The flooring of 40 mm tongue-and-groove boards is laid after the frame has been built.
Walls
frame
Corner posts and upper trim are made of timber 100x100 mm; fastening - already familiar to us galvanized corners. At the time of the construction of the frame, the racks are reinforced with slopes; the structure will reach full rigidity after sheathing. Material for intermediate racks and crossbars - board 50x100.
Attention: window and door openings are tied with a board around the entire perimeter.
sheathing
Sheets of 12 - mm OSB are fastened with galvanized self-tapping screws 51 - 55 mm long in increments of no more than 25 cm. The joints of the sheets should fall exclusively on the racks.
By the way: if you foam the joint before screwing in the screws, the walls will be noticeably warmer.
Warming
The vapor barrier is laid under the insulation from the side of the outer skin; its second layer closes the insulation from the inside after the mineral wool mats are installed spaced between the posts. From the inside, they are sewn up later, in the process of interior decoration.
Roof and attic
On the construction of walls, the construction of a garden house with our own hands does not end: we have to build a roof.
- We lay ceiling beams on top of the upper trim (boards 50x100, placed on edge). We fasten them with corners. Step - the same 60 cm as for the racks.
- We construct frames of gables with strapping of light windows and an entrance.
- We sew up the roof (including gables) with 15 mm OSB sheets and cover it with a substrate under the tiles.
- We cover the floor of the attic on top of the previously laid vapor barrier with a board - edged or tongue-and-groove, depending on whether the attic will be operated.
- We install mineral wool slabs between the ceiling beams and fasten the vapor barrier from below with a stapler.
- If it is necessary to insulate the attic, we perform similar operations under the roof.
- We cover the roof with bituminous tiles. Sheets are fastened with galvanized nails.
Assembling the truss system.
The laying direction is from the overhangs to the ridge.
Interior decoration
The traditional instructions for building frame houses are quite standard: the frame is sewn up with OSB both from the outside and from the inside, after which the owner must do the interior decoration.
Most plasters and paints do not adhere to OSB surfaces; the price of specialized primers can plunge even an inveterate optimist into a deep depression.
We will simplify our lives and use plasterboard for wall cladding from the inside. Since the step between the uprights is large enough, it will be necessary to sheathe in two layers with overlapping seams. The pitch of the screws is 15-20 cm, their length is 50 mm; for walls, sheets with a thickness of 12.5 mm are used, for the ceiling - 9.5.
Useful: with a two-layer sheathing, you can do without reinforcing the seams with sickle. Cracks can appear only with a serious deformation of the frame of the house.
Exterior finish
It would be strange to build a house - garden or any other, and not finish it on the outside. The simplest solution is to use vinyl siding; it is mounted on a 40 mm thick crate, necessary for ventilating the space behind it. Don't forget: siding lengthens greatly in the summer heat, so its fastening should provide for the possibility of shifting the planks.
Conclusion
Of course, we have described only one of the countless possible designs. Additional information on how to build a house in the garden, will offer a video in this article. Good luck!
Many, wanting to spend their summer holidays in nature, have been saving up for years to buy a dacha with a capital house and refuse inexpensive garden plots. And absolutely in vain! After all, it is not necessary to build on suburban area brick villa, you can go the other way - build a garden house. This light building is built in the shortest possible time, is inexpensive and quite suitable for living in the summer. In this short article, we will tell you how to build a solid summer house on the site, adhering to the principles of functionality and practicality.
As a rule, inexpensive garden houses are built from timber or using frame-panel technology. The construction of both options is not much different from each other: first, a foundation is erected, then a frame is assembled, which is then sheathed. The difference is visible precisely at the stage of sheathing, since panel houses are finished with sheets of plywood, chipboard or fiberboard, and timber houses with ordinary or profiled timber.
Construction of garden houses from timber
We can say that garden houses made of timber have already become classics of the genre of summer cottage construction. The beam looks quite decorative, and is also a durable, strong and unpretentious material. If you wish, you can use not an ordinary beam, but a profiled one - with spikes and grooves that allow you to assemble elements, like a designer.
Many construction companies offer finished projects garden houses made of timber and even whole sets of elements that you just need to assemble into one design. Such a house is mounted very quickly, however, the cost of it will be noticeable.
Let's look at the main stages of building a house from a bar.
1. We are building a foundation, which can be tape or columnar. When building a large house, it is preferable strip foundation, which is characterized by high reliability and the ability to withstand significant loads. If it is planned to build a small garden house, then it will be sufficient to build column foundation.
In order to build such a foundation,  it is necessary to determine the location of the pillars, which must be located in the corners of the future house and along the walls in increments of 2m. In these places, holes are drilled 1.5-2 m deep, which are filled with concrete.
As a foundation for garden houses, ready-made concrete slabs are often used (for example, with dimensions of 200x200x400 mm), which are installed in the ground to a depth of about 15 cm in a pre-tamped  sand cushion.
After the foundation is ready, a sheet of waterproofing material, for example, roofing material, is laid on it.
2. We arrange the frame. The bottom trim (crown, logs) from a beam 150x150 mm is laid on the foundation supports, then vertical supports are installed from the same beam (or a smaller one in profile).
 If you decide to build a garden house with a veranda, then in this case the lower logs must be extended by the length of the veranda, installing them on additional support posts.
3. We lay a draft floor from boards with a thickness of at least 20 cm.
4. We collect walls from a bar. At the same time, we fasten the joints with dowels, cover with a sealant  and lay out the next crown on the resulting row. Each layer is supplied with a sealing material, which can be used as tow, moss, jute.
5. We arrange the roof. To install the rafters, we use boards 150x40mm, and for braces and racks, smaller boards - 100x40mm are suitable. Further, the structure is sheathed with timber, on which roofing material is laid.
6. We cover the subfloor with a layer  mineral wool, which will serve as thermal insulation, and glassine - a waterproofing and vapor barrier material. Next, you can proceed to the clean floor, which is made in the form of boards, thick plywood, linoleum.
7. We cover the outside of the house with a primer and paint it with enamel. There is another option, more interesting - to sheathe the bars with clapboard or siding.
8. The building is ready, now you can install doors and windows, as well as think over the interior of the garden house. If you are close in spirit to the country style, then the garden house is the best place for the realization of your interior fantasies. Indeed, in a city apartment, as a rule, country style inappropriate, but on the garden plot - just right.

How to build a panel garden house?
Panel garden houses are built an order of magnitude faster than a “designer” made of timber, because for sheathing it will be necessary to strengthen not small wooden elements on the frame, but large sheets of plywood. It will take a week or two for a light summer building to appear on your site, which looks quite solid if it is sheathed with wooden clapboard or siding. As already noted, the construction of such a house is almost no different from the construction of a house from a bar. However, we will nevertheless consider the main stages of construction and point out the differences.
1. Foundation racks are installed.
2. The frame of the house is being erected: the lower sheathing, the upper sheathing, vertical supports, rafters. It is worth noting that for the further installation of windows and doors, it is necessary to form their contour from additional bars.
3. Make a draft floor from thick boards.
4. Sheathe the frame from the outside with plywood sheets, fixing them to vertical supports using self-tapping screws. Further, already inside the house, the frame is sheathed with a second layer of plywood, chipboard, fiberboard or drywall. In order for the house to be warm and you do not freeze on cold summer nights, a layer of insulation - mineral wool - is laid between the first and second layers.

5. Arrange for a normal, clean floor.
6. The roof rafters are sewn up with plywood, which is then painted with drying oil and covered with roofing material, for example, roofing material.
7. They sheathe the house from the outside with siding or clapboard - this is necessary so that the building acquires a respectable appearance and does not look like a cheap temporary hut.

8. Install doors and windows. Moreover, you can afford not only wooden, but also plastic windows - they will look quite organically with modern paneling and siding.
That's all the main stages of building economy class houses. The foundation of any such building is erected in exactly the same way, but for one builder the result will look like Uncle Tom's hut, and for another it will look like a solid country house. By connecting your imagination, you can come up with such a finish for seemingly banal plywood sheets that all the neighbors will gasp! Below we have selected photos of some of these houses - take a look and be surprised!
Garden houses: photo selection


