
How to make an irrigation system with your own hands. Garden irrigation systems. Types, features of use and methods of manufacture
Few gardeners are lucky enough to live in a climate where it rains in the right amount and at the right time. Most still have to water their green pets. Watering the garden with your own hands is a laborious task. But if, in addition to hands, you put your head on it, then this activity becomes interesting and creative.
Possible options for watering the garden
Agricultural reclamation specialists have developed many ways to irrigate a variety of crops. Not all of them are applicable in the garden. The choice of how to water the garden with your own hands depends on several factors:
- the need of grown crops in water;
- mechanical composition and moisture capacity of the soil;
- weather and climatic conditions;
- availability of water for irrigation;
- financial capabilities of the gardener;
- garden area.

The main ways to water the garden, which you can organize with your own hands:
- furrow irrigation;
- watering with an overlap on the strips and checks;
- sprinkling;
- drip surface irrigation;
- subsoil drip irrigation.
Each of the options has its own advantages and disadvantages.
Overflow irrigation is simple, but degrades soil structure in flooded areas.
Sprinkling is convenient, but promotes the development of fungal diseases.
Subsurface drip irrigation saves water and time, but is costly.
To achieve the best results with the least effort and money, several watering methods are usually combined.
Automated garden watering

Automation, in principle, lends itself to all the above methods of watering the garden. With your own hands, you can even assemble the necessary electronic circuits, although in our time it hardly makes sense. Unless, if electronics is your hobby or profession. The essence of automation lies in the installation of soil moisture sensors, which give a signal to special electronic devices to open or close shutoff valves on the water supply system or turn pumps on and off.
Automating a flood irrigation system for small gardens is unprofitable. They will be too expensive. Yes, and without visual control of the filling of the furrows, it is difficult to do. Automation of home sprinklers is much easier. It is only important to correctly position the sensors. But subsoil irrigation is best used in automatic mode, or at least install moisture sensors with indicators to know when the soil moisture in the root zone reaches the desired value. Too much moisture is worse than too little.
Video: how to organize automatic watering of the garden with your own hands
The use of plastic bottles for watering in the garden
I have a cottage with a small garden. But it is far from the city, so I come there only for the weekend. Since the summer was hot, without regular watering, many crops died. A neighbor suggested that you can use plastic bottles for watering the garden. Tell me how to do it in practice?
Watering the garden is a sore point for summer residents, especially for those who visit the cottage only on weekends. Yes, and for those who live in the country, but have problems with constant water supply, watering remains an urgent problem during the summer drought. Gather rain water- not a very suitable option when precipitation is irregular and not plentiful. System acquisition drip irrigation requires a lot of money from gardeners. And here unnecessary, at first glance, things - plastic bottles - will come to the rescue.
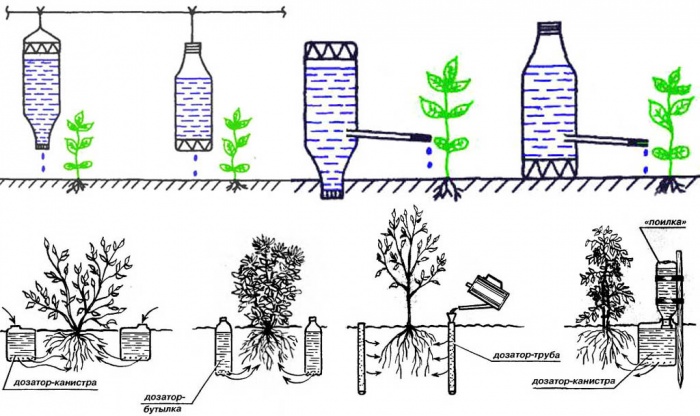
Among the many ways to use plastic bottles for irrigation, there are three of the simplest and easiest to assemble and operate:
- Watering from bottles without burying them in the ground.
- Drip irrigation from bottles buried in the soil.
- Suspended watering system from plastic bottles.
Benefits of using plastic bottles

The use of plastic bottles in the garden for irrigation will significantly save on the purchase of expensive equipment, moreover, with the help of such a system, it is possible to irrigate the entire plot, and not just individual beds. The advantages of the "bottle" system are also that:
- the soil is moistened a meter deep;
- plants receive already heated water;
- bottles can be used both in open areas and in greenhouses;
- there is no change in the composition of the soil;
- it is possible to add liquid top dressing;
- constant access to water does not allow plants to "starve";
- allows you to water not only garden, but also garden plants, bushes and trees.
A weighty argument in favor of the use of plastic bottles in the country is the fact that in the absence of the owner, thieves are unlikely to covet such an irrigation system.
Watering from bottles without burying them in the ground

Fill a 2 liter plastic bottle with water, leaving a little empty space up to the top of the bottle. Instead of a lid on the neck, put a piece of foam rubber that is suitable in size. Put the bottle under the plant at the very root.
Spread such containers with water throughout the area for each planted crop. When the bottles are completely empty, they must be refilled with water.
Drip irrigation from bottles buried in the soil

Cut the bottom of the bottle, but not completely - to get something like a lid (it will protect water from getting into the ground and from evaporating in the sun). If desired, the bottom can be cut off completely. Screw the cork tightly, and make small holes around the neck at the top of the bottle for water to escape. Such holes can be made directly in the cork itself.
When watering sandy soil, 2 holes are enough, and for LOAMY soil, 4 holes are needed.
Bury the bottle between seedlings 15 cm deep, while the incised bottom will be on top, and the neck will be on the bottom. To avoid clogging the holes, it is recommended to put dry grass under them. Pour water, cover with a lid-bottom. Top up as needed.
Hanging watering system from plastic bottles

Cut off the bottom of the bottle, and make watering holes in the cork. Some gardeners leave the cork intact, and simply unscrew it slightly so that the water flows out little by little.
Make a support-holder: install a slingshot holder at both ends of the beds, and put a crossbar on top. Hang the bottles upside down on the support and pour water into them. Cover the soil under the bottle on which water will drip with a small piece of film and sprinkle it with earth. This is necessary so that the drops fall on the film, and already flow from it to the ground, and not blur it.
How to make drip irrigation from a 5-liter bottle will show the video
Do-it-yourself drip irrigation from plastic bottles
Modern gardeners know firsthand about drip irrigation - this is the most convenient and economical way of irrigation. With the help of such a system, you can water vegetable beds, greenery, and ornamental plants in the garden or on the windowsill - drip irrigation has a lot of positive qualities.
However, there are features of this method of irrigation, and one of them is the high cost of ready-made autonomous systems connected to the water supply. But craftsmen found a way out and offered to make drip irrigation systems from improvised materials - one of the most affordable are plastic bottles.

How to ensure regular watering of vegetables and build drip irrigation with your own hands from plastic bottles - you can learn about this from this article.
What is drip irrigation and what is its strength
Watering with drip system- this is the process of delivering moisture directly to the roots of plants, carried out in microdoses - drops. Purchased autonomous irrigation systems are connected to the water supply or connected to water tanks. The principle of their operation is based on the fact that water accumulates in tubes laid out between the beds, and seeps through the smallest holes to the roots.

Drip irrigation has a number of advantages over the conventional irrigation scheme from a hose or watering can, among the advantages include:
- Economical water consumption - the gardener does not have to water all the land around the plants, moisture flows purposefully - to the roots of the vegetable crop.
- Minimum physical costs summer resident - a person is only required to decompose the systems between plants and connect them to a water supply source. There is no need to carry heavy buckets and shift hoses.
- Point distribution of water, which will flow specifically to the roots of the garden crop, and not saturate weeds and neighboring beds. So the plants will be healthier and stronger, because they will never experience a lack of moisture.
- The earth between the beds will not be taken with a crust, because moisture does not get to the surface, but to the trunk of the crop. Therefore, the summer resident will not have to perform additional work - loosening the soil.
- Moisture from the drip irrigation system does not get on the leaves and fruits, which minimizes the likelihood of sunburn and fungal diseases.
- The possibility of remote cultivation of vegetables and herbs, which is especially important for summer residents who visit their plots only on weekends.
- The possibility of using a drip irrigation system and in open field, and in greenhouses or greenhouses. Moreover, the temperature of the water in the system will always be approximately the same, because during the day the pipe heats up a lot.
There are some imperfections in the drip irrigation system. For example, such irrigation cannot be called complete - plants still need to be watered several times a season in the usual way, especially in drought. In addition, it will not work to apply drip irrigation to large areas and install the system on heavy, clay soils that are not able to evenly absorb water.
But still, drip irrigation has a lot of advantages, and therefore is very popular among gardeners and gardeners. The only thing that can stop a farmer is the installation price.
There is only one way to deal with such a problem - to make drip irrigation from plastic bottles with your own hands or use other improvised materials for this purpose (large plastic containers in the form of canisters or tanks, medical droppers, etc.).
How to make a drip irrigation system from a plastic bottle
With the help of plastic bottles, it is easiest to provide metered irrigation of beds, and there are several reasons for this:
- plastic containers are available - all residents of the country have bottles;
- there are many varieties of bottles by volume - you can choose right size containers for any plants;
- it is very easy to work with plastic with your own hands: the bottle can be cut with an ordinary knife or scissors, it is easy to perforate it, it is easy to connect it with other elements;
- the volume of the bottle may be enough for several days, depending on the needs of the gardener;
- plastic bottles are very practical and durable - the designed irrigation system will last for several seasons.
Calculating how much water the bottle will give to the plant, and for how long such watering will last, is quite simple - this can be done experimentally. Much here depends on the composition of the soil on the site and on the size of the number of holes in the plastic container.
On average, we can say that:
- bottles of 0.5-1 liter will last for 2-3 days;
- a container with a volume of 2-3 liters will be able to water the beds for 5-10 days;
- large plastic bottles of 5-6 liters will be enough to irrigate the bushes for two weeks.
Important! There are several ways to make a watering system from bottles. You need to choose the appropriate method based on the characteristics of the site and the plants planted on it.

What is required for work
To make a drip irrigation system out of a plastic bottle, you will need the simplest materials and tools:
- plastic container of the required volume;
- a cap that fits the neck of the bottle;
- knife or scissors with sharp blades;
- an awl, a thick needle, or a small nail to make holes in plastic;
- thin cotton fabric or unnecessary nylon tights.

Important! Cloth or nylon is needed to create a filter - if the water for irrigation is not filtered, small holes in the plastic will easily become clogged with earth particles or other debris.
Method 1: Buried Bottle
To implement this drip irrigation option, you will need a plastic bottle of a suitable size. The container should fit freely between adjacent plant bushes - so it can irrigate two bushes at the same time.
If you need to water only one plant, you can take a smaller bottle, and make holes in it only on one side, turned towards the bush.

Now you need to take a thick needle or a small carnation and make several holes with this tool over the entire area of \u200b\u200bthe bottle. However, at least two centimeters should remain to the bottom of the container; the neck should not be perforated either. The approximate number of holes on a two-liter container is 10 pieces.
A hole is dug in the ground near the plants, approximately equal to the size of the bottle, the container is completely buried in it, only the neck remains above the surface of the earth. A nylon stocking should be strengthened on the neck in order to filter water for irrigation through it.

The lid can be twisted, you can not twist it - only the rate of evaporation of water from the bottle depends on it.
Drip irrigation is ready: it remains only to add water through the neck in a timely manner using a watering can or a thin hose.
Method 2: hanging bottle
This watering option is more suitable for undersized plants, such as cucumbers, for example, or greens (parsley, basil, lettuce). In order to complete such a system, you will need a base or frame made of wood or metal.
The bottle frame is made in the form of the letter "P" or "G" and is placed above the ground at a height of no more than 50 cm, otherwise the drops will simply hit the ground, creating depressions and splashing heavily on the sides.
Bottles are selected in accordance with this parameter (their length should not exceed 40 cm). The number of containers depends on the number of plants that need drip irrigation - there is one bottle above each bush.

Advice! It is best to hang a container of water so that the drops do not fall on the plant itself, but fall between neighboring bushes. This will avoid sunburn and various infections due to wetting of the green mass.
Holes are made in each cap, the size and number of which depend on the required irrigation intensity - the more holes, the faster the water will flow out of the bottle.

Now you can cut off the bottom of the bottles, and make holes near the cut edges. Through these holes, the bottle will be attached to the frame with a wire or rope.
Drip irrigation is ready, water is added through the bottoms.
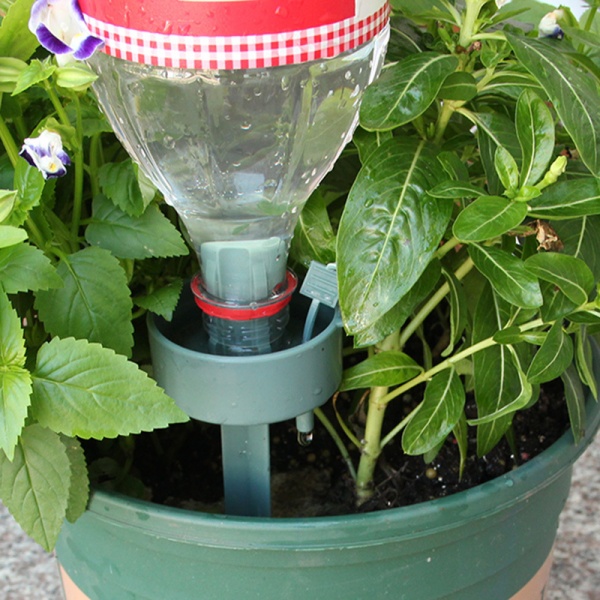
Method 3: upside down bottle
This option of drip irrigation is similar to the first one, but differs in the depth of immersion of the container - the bottle is not completely dug into the ground, but only in the upper part, that is, the neck.
That is why, the third method of drip irrigation from plastic bottles is suitable for plants with a compact root system. Long roots that go deep into the ground, such a bottle will not be able to nourish, but the branched surface roots will receive enough moisture.

To realize an idea, take plastic container, close it with a lid and make holes in it of the desired diameter (approximately 0.5-0.6 mm). The lid is removed, the neck is covered with nylon or a thin cloth and the cap is screwed on again.
There are two ways to deal with the bottom of the bottle:
- Cut it off - then water can be added directly to the container fixed in the soil, but the liquid will evaporate very quickly.
- Leave the bottom, but make a small hole in it, which will help to reduce the pressure inside the bottle and more intensive outflow of water (according to the principle of a dropper). In this case, the bottle will have to be taken out of the ground each time, filled with water, and then dropped again.

Everyone independently chooses the appropriate option.
Watering through plastic bottles can be a great option for those who rarely visit their summer cottage or do not have large supplies of water. However, such irrigation cannot replace full watering from above, so these two methods must be alternated. But the cost of a home-made system is zero - no special knowledge, tools or materials are required to make drip irrigation.
A big plus of drip irrigation through bottles is that in this way it is possible to produce and feed vegetables with mineral complexes dissolved in water. Dosed fertilizer will not burn the roots of plants and harm them.
Combined irrigation system in the country
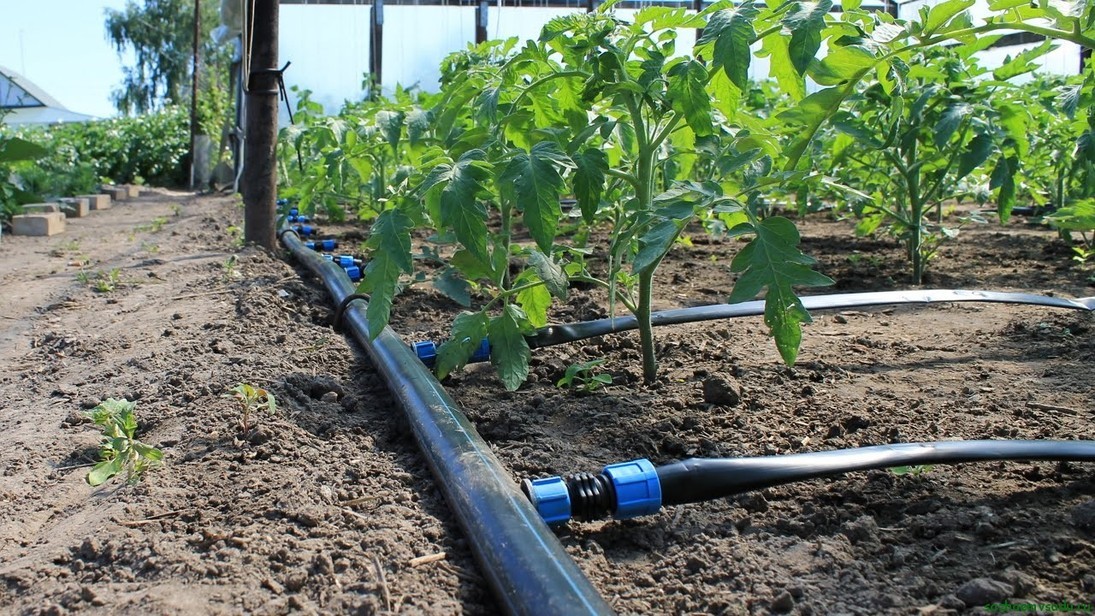 Combined watering at their summer cottage can be arranged independently. To do this, over each bed you need to stretch plastic hoses. The combined irrigation system is connected to central system water supply or to an independent source of water. In the first case, it is not necessary to integrate a filtration system into the irrigation control unit.
If you connect combined irrigation to a well or well, then it can be automated. For automation, an electronic system for opening water valves is installed on the irrigation control unit. The pump is set to turn on when the stopcocks are opened.
You can install a combined irrigation system without automation. In this case, the system is connected to any water source, both autonomous and centralized.
Combined watering
Combined irrigation is a system of connectors and hoses. A 100 micron coarse filter and several pipes with stopcocks are installed in the irrigation system. A reducer is also installed to reduce the water pressure in the drip irrigation hoses. The control unit is ready. After the control unit, a distributor is connected to the pipe using a compression coupling. It allows water to be supplied independently to each hose, which makes it possible, at low water pressure in the main pipeline, to redirect water to each bed. Combined irrigation is the simultaneous use of drip and overhead irrigation.
Drip irrigation setup
First, drip irrigation is done. Each hose is perforated and laid near the plants. The combination irrigation system is filled with water before setting up and testing overhead irrigation, as the sudden increase in pressure can rupture drip irrigation hoses at first start-up. Next, adjust the pressure using the distributor. When drip irrigation is working, you can adjust the hinged.
Overhead irrigation
For overhead irrigation near the beds, you need to install props. Irrigation hoses must be at least ¾ inch in diameter. On the hose you need to make cuts on both sides of 2 cm each. The distance between the slots should be at least 10 cm. At a water pressure of 3 atmospheres, each hose will cover the width of the bed of 70 cm. The overhead irrigation system is carried out to provide water for long but narrow beds.
The advantage of combined irrigation
Water consumption when using a combined irrigation system is lower than when using a drip or mounted system separately, since it is enough to irrigate within 30-45 minutes.
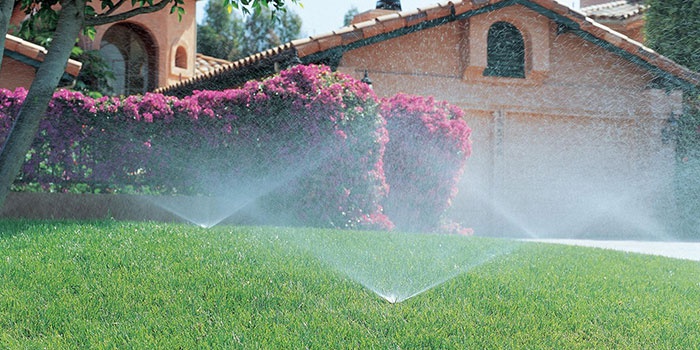
In the summer, it is very important to water the garden on time. Everyone who has his own summer cottage knows how relevant the issue is, especially if the summer does not indulge in rain. Garden water sprinklers have become faithful helpers for those who want to reap a good harvest from their garden, because during the dry summer months, watering is indispensable. What models of sprayers are there, how to save money and design a water sprinkler yourself - this and not only our article is about this.
Watering the garden with a sprinkler
Watering is an essential part of maintaining a garden or vegetable garden. The effect of the sprinkler resembles natural rain, therefore it has a very beneficial effect on the growth of plants in the garden, the earth does not become covered with a crust after drying and it does not need to be loosened after each watering. Finely dispersed drops of water moisten the garden soil gradually, unlike watering from a hose or watering can, which can wash out the ground near the roots, thereby damaging the plant. Life-giving water dripping onto the leaves, entering the roots, gives them an impetus for growth.
In order for the process of watering the garden with water to be controlled, use systems that work not only in manual, but also in automatic mode, irrigating certain areas of the garden or garden in right time and in the right amount. First, decide where the water will come from. When groundwater is at a short distance, it is better to drill a personal well in the garden. To supply water to the top, a submersible pump or motor pump is used. Through the hose, water enters the irrigation system and the garden area is watered.
Not being able to drill a well, summer residents use a barrel water storage tank. A large capacity container, preferably at least 200 liters, is installed in the garden, filled with water that enters through the water supply. A hole is drilled in the barrel, equal to the diameter of the pipe, which is inserted there and an adapter and a hose are fixed on it, leading to the irrigation system of the site.
The main types of sprayers for the garden, garden and lawn
If you are already familiar with the mechanism for supplying water to the hose, it is worth considering the main types of water sprayers designed for watering a garden, lawn, or garden. The distinguishing criteria is belonging to the vertical or drainage type, which feeds the root system with water. The vertical view is more common, since during the operation of the sprinkler it is covered big square glaze. We offer you to get acquainted with several types of irrigation devices.
fan garden sprinkler

Under the influence of water pressure, sprinklers automatically rise above the ground by 10-30 cm, when turned off, they fall down to the level of the soil. Fan sprinklers can water a fixed length of garden area (PS series) or a jet of water can change the distance (SRS series). With a fixed jet length, only the angle of inclination of the water can be changed with the help of nozzles. For the SRS series, there are several types of nozzles, painted in different colors, which characterize the range and angle of the irrigation jet of water.
- Brown - range 2 m, low altitude, almost above ground level.
- Red - range 3 m, elevation angle 15 degrees.
- Green - range 3.5 m, 15 degrees.
- Black - range 4.5 m, 15 degrees.
- Gray - has three fans rising 28 degrees, the jet range is more than 5 m.
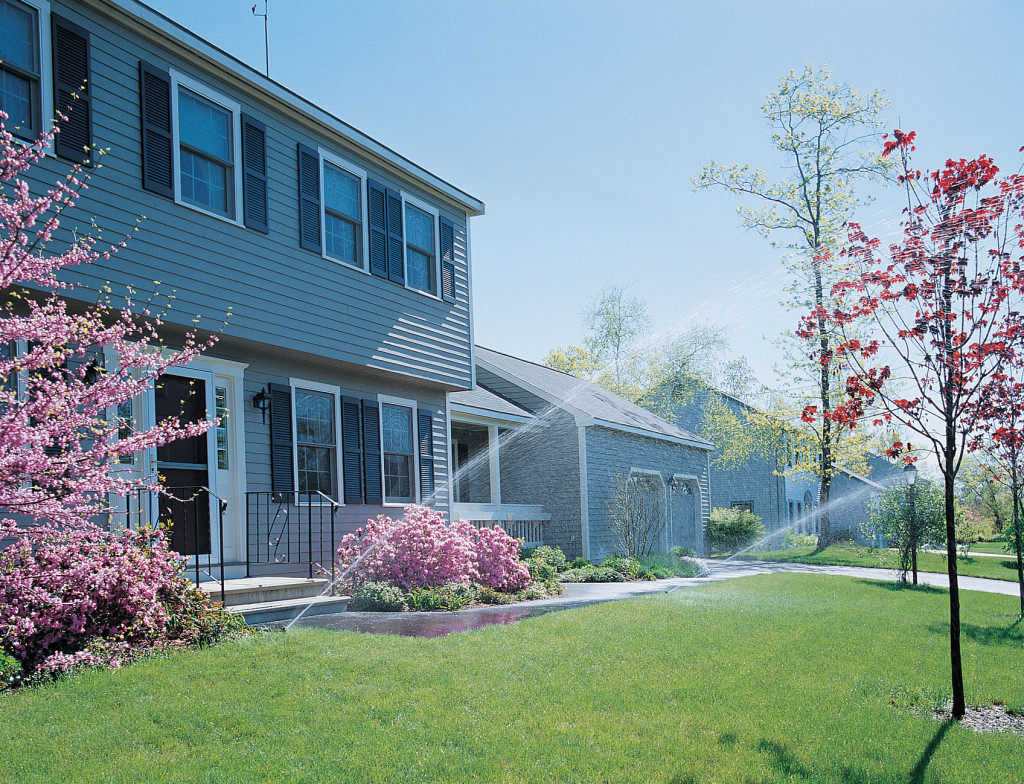
Umbrella sprinkler
For umbrella water sprinklers, pipes are laid in the ground to a depth of 30-40 cm, retractable sockets appear above the ground during irrigation. The name of the sprinkler was given with the external resemblance of the sprayed water to an umbrella. The formed "tent" from the water is used for irrigation of large trees, shrubs, where watering is necessary in the immediate vicinity of the plant root. Sockets built into the pipes allow spot irrigation using hoses for a specific sector.
Rotary water sprayer

Rotary water sprayers are considered the most economical among analogues. Available in three versions: short, medium and long range. The maximum length of the water jet can reach up to 20 m. Adjustable irrigation angle from 10 to 360 degrees. In connection with the ability to rotate a full turn, the rotary atomizer has another name - "mad flower". All rotary sprinklers use nozzles, due to which water is distributed evenly.
Pulse sprinkler

Pulse sprinklers are good to use if your garden area is large. This type of sprinkler is used for directed watering of plants in the garden or trees in the garden. Irrigation diameter can be 14 m. According to the structure, it has three horns, each of which rotates independently and is adjusted separately, which has a positive effect on high-quality irrigation.
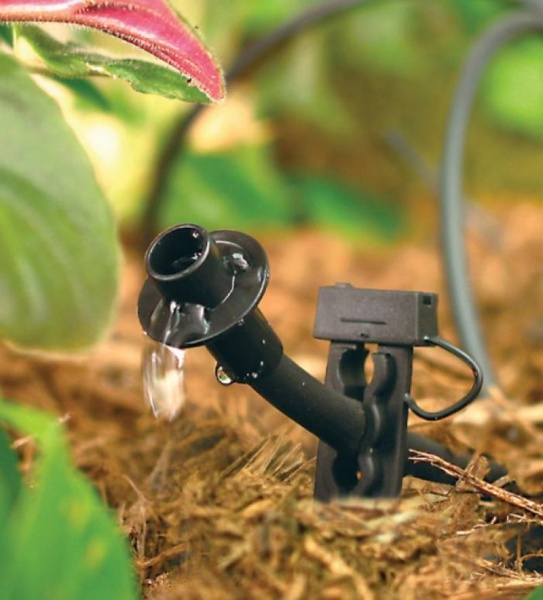
How to make a sprinkler with your own hands - instructions with video
Household plots and vegetable gardens need not only watering. Spraying with chemicals will help protect the future crop from pests and diseases. In order not to spend a large number of funds, a homemade device, which is discussed in the video, performs the functions of a sprayer. It is rational to use it for watering trees and gardens. For this you need:
- Plastic sprayer. Even the one that is out of order will do, as long as the nozzle is preserved.
- Plastic bottle.
- Wooden, aluminum stick of the length you need.
- Rubber hose 3-4 m.
- Pump.
The design of the sprinkler is assembled from prepared materials in 15-20 minutes.
- Attach the atomizer to the stick, in the position as shown in the video.
- In a plastic bottle near the neck, make a hole with a hot nail and place a screw with a hole drilled inside it. Fasten the screw with a nut, use rubber gaskets for reliability against leakage.
- The bottle is filled with water from the watering barrel or chemicals if you plan to treat the plants.
- One end of the hose is put on the screw, which is in the bottle, the other is attached to the pump.
- A sprayer is inserted into the neck of the bottle.
- After pumping air into the bottle, creating pressure there, you can start watering or pollinating by adjusting the streams of liquid by turning the valve on the sprayer.
- The diameter covered depends on the length of the stick you choose.
Photo homemade devices
Some "Kulibins" who work in vegetable gardens and dachas, in order to ease the hard physical labor associated with watering the garden, come up with simple but effective home-made designs. To tell other summer residents, home designers share their experience and photos of made fixtures. Here are some homemade sprinkler mechanisms for watering the garden, garden, lawns with water.

Where to buy and how much are well-known brand sprinklers
Each owner of a garden, cottage or garden should have an irrigation system in his arsenal if he wants to collect good harvests or admire the lush greenery of flower beds and lawns. When there is a financial opportunity to purchase professional equipment for watering the garden with water, then you should choose trade marks, which have proven themselves as high-quality movements, such as Karcher.
- Hozelock, operating in the market specializing in garden equipment, accessories, hoses, is ready to provide a wide range that you can choose from at hozelock-ru.com. The price range depends on the model and purpose of the selected product for irrigation.
- The Garden Engineer online store on its sadin.ru website offers rotary sprinklers and accessories for them. You can purchase the nozzle for 67.20 rubles, and the sprinkler itself from 972 rubles. and higher.
- The site ozon.ru is ready to offer garden equipment of famous brands such as Kärcher, FIT, TRUPER, Marolex. In the assortment of the online store, which is located in Moscow, Chapaevsky pereulok, 14, you can choose and order sprayers, sprinklers, including rotating, impulse, tips, guns, filters with home delivery. Prices for the existing range of goods from 254 rubles. Half of all store sales occur in Moscow and St. Petersburg.
If you don't water your garden, you won't grow anything on it. This truth is known to every owner of the site. But doing it manually is quite laborious, requiring a lot of time and effort. In order to automate the process, you can make a system for watering the garden with your own hands.
Do-it-yourself garden irrigation systems: types
There are several garden irrigation systems. Each of them can be created by hand.
In addition to manual watering, today there are 3 main ways to irrigate the site: subsoil, sprinkling, drip irrigation.
- Subsurface irrigation is the irrigation of garden plantings and hedges using special pipes or hoses.
- Irrigation - watering lawns, plants and flowers from above. The principle of this option is that the hose is attached to the sprayer, water is supplied to it, and spraying begins.
- For irrigation of individual bushes or trees, a micro-irrigation system and drip irrigation are used. It is suitable for vegetable gardens and greenhouses. Drip irrigation of a personal plot is an ideal method. The advantage of this system is that the water supply is carried out directly to the roots of the plants. In addition, drip irrigation can be carried out even in the heat, as it eliminates the ingress of water on the leaves of plants and, as a result, sunburn.
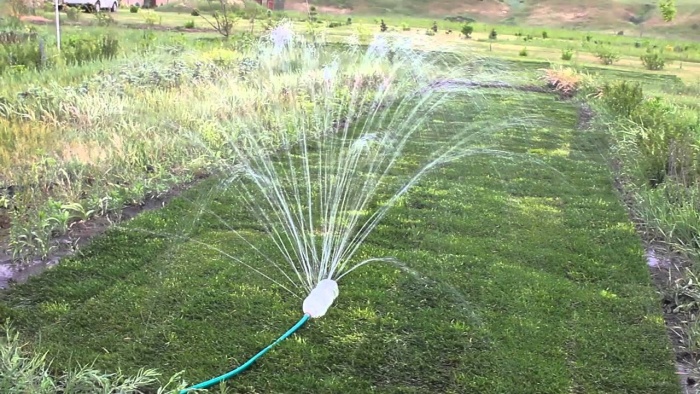
How to make sprinklers for watering the garden with your own hands?
Ideal for irrigation suburban area- Sprinkler without motor, self-assembled. With it, you can control the pressure of water and the size of the drops.

To make the most primitive atomizer you need:
- Iron column 50-80 cm long;
- Hole making tool;
- Hose;
- Pens;
- Plastic bottle.
An excellent solution for a column is an iron pipe. It is necessary to tie a hose to it, this must be done in at least 3 places from the base to the very end. The end of the hose should protrude 7 cm from the end of the pipe. Thus, the system will be more flexible and its direction can be easily changed. For fastening, use tape insulation, but do not forget that it loses its quality when wet. Therefore, tie the ribbon as tight as possible, and fasten its ends with a ball of thread.
A sprinkler can be made from a regular plastic soda bottle. You need to make holes in it yourself at a height of 3-4 cm from the base of the bottle. Their diameter should be at least 2 mm, but not more than five. The ideal size is 3 mm. In order to make them, take a thick pin or awl. If they are not at hand, then you can get by with a nail. Pierce holes in rows from top to bottom. A simple atomizer is ready! The design can be upgraded at your discretion.
How to choose a pump for watering the garden?

For the garden, 4 types of pumps are used: barrel, surface, submersible and drainage.
- Watering from the tank: barrel pump
Easy to install and easy to use - barrel version. It is designed for pumping water from storage tanks - barrels, etc. A barrel pump pumps water from a tank up to 1.2 m deep.
The weight of such a system is not more than 4 kg, with it you can walk around the site. Such a pump is fixed on the edge of the tank, plugged into the network and watering begins. The pump has a pressure regulator with which you can set a higher or lower pressure, a debris filter and a hose.
A big plus of such a pump is low level noise. When choosing a model, pay attention to what volume of capacity the pump is designed for, how much water it can pump per hour. The most reliable device with a two-stage mechanism. It has better performance and longer service life.
- Surface pump: for reservoirs and shallow wells
If the main source of water is a natural or artificial reservoir, a pond, a pool or a shallow well, then buy a surface pump. It is needed for pumping water from a depth of up to 10 m. They usually put such a unit on the ground, and the injection is carried out using a special water intake hose lowered into the source.
The surface pump is very noisy, so it is hidden in outbuilding to get rid of its loud sound. You can reduce the noise level by placing the system on a rubberized mat that dampens vibration.
- Submersible pump: we get water from the well
A submersible pump is rarely used in the garden, but if there is a well in the country house, then you cannot do without it. An important indicator of the submersible system is the height to which they can raise the water flow. If the well is not very deep, then a model designed for a height of 40 m will do an excellent job of lifting the liquid. For greater depth look for options that can push the jet up to 80 m.
- Dirty Pond or Swamp: Drainage Pump
A drainage pump is needed to pump out flooded rooms and cesspools. Garbage and solid particles are not afraid of him. For irrigation of beds, a system with a chopper for pumping wastewater is suitable. For very dirty ponds - this is the best option. Crushing silt and small inhabitants of the reservoir, the pump will provide the earth with natural fertilizer.
- Automatic irrigation pump with timer
For owners who do not have time to deal with long watering, it is better to purchase a drip irrigation pump. It is equipped with a pressure switch, a pressure gauge and a hydraulic accumulator. The mechanism works in the established mode independently. There is both manual and automatic control, which is carried out by the timer.
When choosing garden irrigation systems, always pay attention to what kind of water they are designed for and what exactly you need to water. These factors will allow you to find the best option in a garden equipment store or assemble the desired model yourself. The irrigation system is extremely convenient, it allows not only to ensure the timely moistening of the soil, but also to control the level of its moisture.
Watering plants is a very important question that any gardener asks. It's no secret that any crops on the site require a sufficient amount of water for their growth. And for different plants, the rate of watering is different. Yields largely depend on how well the garden irrigation system is arranged. We will talk about this in more detail below.
In order to properly arrange watering the garden, you need to know the following:
- The need of plants in the area for water.
- Soil composition.
- The quality of water and the technology of its supply to the site.
If there is no centralized water supply on the site, then an electric pump will be required to water the garden. Its choice depends on what source of water supply will be used. Most often, water comes from a well or from a well. To facilitate the work of gardeners, automatic watering of the garden is sometimes used.
Watering methods
We will tell you more about the available methods of watering the garden with your own hands.
Watering in the wells

This method is used for watering trees. Holes are made according to the size of the crown, after which they are leveled, and rollers are arranged around. Ready recesses are filled with water. Do not pour water directly on the roots. Otherwise, they will start to rot. Therefore, this must be done with an indent from the barrel by about 400-500 millimeters. When using this method of irrigation, water gets exactly where the roots are. With the advent of spring, melt water collects in the holes. In a growing tree, holes should not remain the same size. It is necessary to periodically make new ones, as the crown grows.
The disadvantages of this method include the following:
- Requires a lot of manual labor.
- The earth in the holes becomes denser over time, which requires laying a layer of mulch and fertilizing the soil.
Irrigation in furrows

This method of watering is convenient when land plot has a slight slope. When arranging furrows, it should be taken into account that the distance between them, their width, length and depth of cutting depend on the slope, irrigation rate and soil type. So, for example, on heavy soil, this distance is made equal to about 1 meter. On light soils, furrows are already cut at a shorter distance - about 0.5 meters. This should be done carefully so as not to damage the roots of the trees.
Depending on the slope, the depth of the furrow can vary from 120 to 250 millimeters. Moreover, the smaller the slope, the deeper the furrows. A significant disadvantage of this method is the irrational use of the land. In addition, a lot of water is consumed for watering the garden.
Sprinkler irrigation

This method of irrigation can be used in almost any terrain of the site. It allows you to accurately control the flow of water. This results in uniform soil moisture. In addition, this watering increases the humidity of the air. Sprinkling is equipped with special sprinklers for watering the garden or watering cans. A spray irrigation system is also used for this purpose.
Soil irrigation
In this case, water is supplied directly to the root of each plant. For this, there are special hoses, the moisture from which enters the soil. Holes (holes) are dug near each plant. They direct the flow of water. Sometimes gardeners practice watering the garden from a barrel.
Rules for watering vegetables
How to water cabbage

Cabbage loves moisture. So, for example, the moisture content of the soil on which early varieties of cabbage are grown should be kept at about 80%. Therefore, this vegetable crop must be watered very intensively. At the same time, the irrigation rate in each climatic zone is different. Yes, in middle lane for early cabbage, it is 150 liters per 10 square meters. meters. In the southern regions, more water is required for irrigation. Gradually, the watering rate reaches 250 liters per 10 square meters. meters. The severity of the soil also affects watering. So, the heavier it is, the more water is required for irrigation.
Watering tomatoes

Tomato is not as moisture-loving as cabbage. Therefore, at the first stage, it is enough to maintain soil moisture at the level of 70%. After the growth begins, you need to water more often and more. However, not as often as cabbage. Water is required so much that it is enough to moisten the soil to a depth of 40 to 60 centimeters. Watering in the third stage depends on the local climate. So, in the southern regions, tomatoes require slightly more moisture than in the middle lane.
How to water cucumbers

This is another moisture-loving culture. Especially during flowering and fruiting. Before the flowers appear, soil moisture should be approximately 65-70%. At this stage, the sprouts should be watered sparingly. If there is too much moisture, then the plants may not bloom and not produce ovaries. When the fruits begin to form, you need to water more often. The rate of watering cucumbers for the middle lane is approximately 240-260 liters per 10 square meters. In hot weather, it is recommended to carry out the so-called refreshing watering in the amount of 20-50 liters per 10 square meters. meters.
Watering eggplant and pepper

These vegetable crops also require a lot of water for irrigation. If they experience a lack of moisture, then this can slow down their growth, and when buds appear, they may fall off. After these crops are planted in the soil, it is necessary to maintain the humidity at the level of 80-85%. Excess moisture also negatively affects these plants. So, if the soil is excessively moistened at low temperatures, then the sprouts can be affected by fungi. In cool weather, watering should be moderate. In some cases, it should be stopped completely. As for the type of watering, it is recommended to use sprinkling for these vegetables.
Irrigation of onion and garlic
The roots of these plants go into the ground only 16-20 centimeters. Therefore, when watering, it is best to moisten the soil only to this depth. Usually onions and garlic are watered not too abundantly and infrequently. It is quite enough to do this once every 20 days, 210 liters per 10 square meters. meters. To grow products for sale, watering should be stopped when the feather begins to lay down. If these vegetables are needed for long-term storage, then watering stops about a couple of weeks before the leaves fall.
Watering zucchini

Zucchini belongs to gourds, which during active growth and maturation require high soil moisture. This figure should be kept at 80%. At the end of the growth period, shortly before harvesting, watering the zucchini should be stopped.
Watering root crops
Root crops are usually watered about the same. The irrigation regime should be sufficient to maintain soil moisture at 75%. Most of all, these crops need watering during the growth period. In the middle lane at the first stage, the norm for this is 210 liters per 10 square meters. meters. At the second stage of growth, watering should be increased to 260 liters per 10 square meters. meters. In general, vegetables are best watered before 11 am or in the evening about an hour before sunset. To close the rows after watering, it is recommended to loosen the ground.
Watering the garden
The first watering of fruit-bearing pears and apple trees is best done in early summer, when excess ovaries have time to fall off. The second watering is carried out in mid-July, about a couple of weeks before the fruit ripens. It is usually carried out for summer varieties of trees. The last watering for winter varieties is carried out in early autumn. If the summer was rather dry, and the harvest was quite rich, then in August it is necessary to perform the third watering, but already of the entire garden.
Young trees that do not bear fruit need only be watered once in June and once in July. For plums and cherries, the following irrigation scheme is recommended: the first watering is the end of spring, the second is a couple of weeks before the fruit ripens, the third is after the final harvest. For berry growers, the following scheme is shown: the first watering is during the formation of the ovaries, the second is when the fruits ripen, and the third is carried out after harvesting.
When watering, it is necessary to achieve wetting of the soil to the depth of the roots:
- So, for an apple tree, it is enough to moisten the soil by 60-75 centimeters.
- For a young garden - 30-55 centimeters.
- For a pear - from 40 to 50 centimeters.
- For raspberries, strawberries, plums, strawberries, the depth of soil moisture should be 20-30 centimeters.
- For gooseberries, pears, currants and cherries, 30-40 centimeters are enough.

Under mature trees per 1 sq. meter enough 4-5 buckets, subject to sandy soils. Watering is best in evening time, and if a long drought occurs, then it is recommended to do this at night. If water, key or artesian water, then it is first kept for about a day in some container, after which it is heated. In order for the roots to better absorb moisture, the water temperature should be 2 degrees higher than that of the topsoil. In addition, mineral salts, which are so necessary for normal development plants. Practice shows that abundant, but rare watering is more beneficial than frequent watering with a small amount of water. Refreshing watering is also recommended in the morning and evening. For this, 1 bucket per 1 sq. meter.
It is useful to combine watering with the application of organic and mineral fertilizers. It is only advisable to use very weak solutions for this. As a top dressing, urea, mullein infusion or tea flowers are usually used.
If the year turned out to be rather dry, then at the end of autumn, around October, it is advisable to carry out moisture charging. It is necessary for one simple reason - an increase in humidity after a long soil drought causes the growth of shoots and roots in plants, which is undesirable before the onset of cold weather. After all, they can be damaged by frost. If it was not possible to carry out moisture charging in the fall, then it should be done already in May. The water rate for this is as follows:
- for strawberries, strawberries and raspberries 2-4 buckets,
- for fruit trees 4-6 buckets per 1 sq. meter.
If persistent dry and hot weather is observed in May, then in order to moisten the overdried layer of the earth, it is advisable to carry out a second watering around the beginning of May. The norm in this case is 1.3-1.4 buckets per 1 sq. meter.
Every garden has its own watering times. To make sure that such measures are necessary, a soil sample is taken from the depth of the roots. Watering is necessary in the following cases:
- On light loamy soils - if the formation of the earth in the form of fragile balls is observed.
- On sandy soils - if the earth is moist, but lumps do not form.
- On heavy soils - if an earthen lump forms, but when pressed, it breaks up.

Suitable containers will be needed to heat water. For example, you can use a large iron barrel. Only if there is rust, then it will have to be cleaned, which can be done with an iron brush. After that, dark-colored oil paint is applied to the surface, preferably in two layers. The barrel must be installed in a place where the sun's rays penetrate best, and for the convenience of typing, a water pipe should be drawn to it.
A plastic bag is also sometimes taken as a container for water. In this case, the following is done:
- The bag is placed in a bag or net, after which it is hung on a stake or bough of a tree near the place of watering.
- When the bag is filled with water, the end is passed into it. main pipeline, and the neck is tied with a rope.
- After that, the line is disconnected from the nearest cross.
- Then suck the water out of the bag.
- As soon as water flows from the pipe, attach it back. The flow rate is adjusted using screws.
- Dignities and clothes of Orthodox priests and monasticism
- Healers and fortune tellers - why do people go to them?
- During confession. Preparation for confession. List of sins for confession. How to dress for confession
- Praise of the Most Holy Theotokos Praise of the Mother of God with an akathist what they pray for