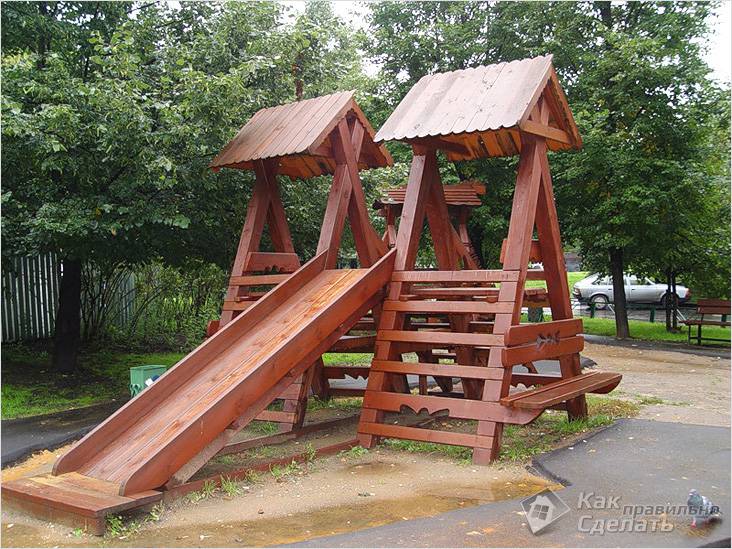
Wooden structures on the playground of the kindergarten. How to make a children's slide with your own hands - instructions for home craftsmen
On the backyard plot there is traditionally a place for a gazebo or a veranda, a garage, all kinds of vegetation, but one more serious element must be foreseen. An important issue for families with children is the organization play area. If there is no separate play area, children are tempted to play anywhere but where they need to: on the lawn.
Often adults are busy with their own affairs, they want to chat with friends or go to the bathhouse, and in order for children to be interested in visiting a country house, several swings, a sandbox and other entertaining moments should be present.
You can turn to specialists, firms for the arrangement of adjacent territories will bring and assemble the playing area in a matter of days. True, this method is quite expensive, not to mention the fact that it will be much more important and valuable for children if adults show attention to them and try to organize a place for games themselves.
Children's playground do-it-yourself is an easy task for do-it-yourself homeowners and will help save money. Consider in this article the arrangement of children's play areas on the site.
Choosing a site for a site: what is the most important thing?
Where the site will be located depends on the size of the site, the place occupied by other buildings and the area that you are ready to allocate for this undertaking. It is desirable that the place for children to play is within the sight of adults, away from gates and dog kennels. This is dictated primarily by the safety of the younger generation, because a stranger can knock on the gate, and even a domestic dog can bite the kids or just scare them.
The playground must be located in the adult supervision area
It is better if the children can be seen from the window, so the adults in the house can look at the players and, if necessary, come to the rescue in time.
To prevent unpleasant odors from entering the site, it must be located on the other side of the local area.
If the area provided for the playground is large enough, you can enclose it with a small fence and put a few small benches.
Scheme of a children's playground in the country: how much is it needed?
 Site plan
 Like everything that is built in the country or in country house, the playground needs to build a diagram, plan or drawing. You can do it yourself even for those who do not have drawing or design skills. If the kids are already big, consult with them: what is important for them to see on their personal territory?
So, what objects it is desirable to design for a playground?
- Swing. In addition to the fact that children usually like to swing, spending time on this attraction trains the vestibular apparatus of little explorers.
- children's house. For the game "mothers and daughters" small house, perhaps irreplaceable. So children copy adults, playing in the family, learn to build relationships with each other, and girls "work out" the future role of mother and mistress of the house.
- Sandbox. This element is indispensable if you have a child under 4-5 years old. Sand games develop fine motor skills, and this is important point when preparing the hand for writing, affects the child's development for school. You can purchase a mobile plastic sandbox, such elements are made with covers to protect sand from animals and rain. You can also build a sandbox out of bricks or timber with your own hands.
 Sandbox
In general, it does not matter how you arrange these or other elements of your choice on the playground suburban area, you can combine them, swap them, and re-mark the spot each spring. But some elements (for example, a swing, a stationary sandbox, a house) need to be fixed once and for all due to the fact that they need stability.
Arrangement of the playground: what to look for?
First you need to mark the territory, mark the places of barriers, sandboxes, houses, etc., according to the scheme.
 Crushed stone paths and mobile flower beds for the playground
 When designing a playground, it is necessary to take into account the material of the pavement, the presence or absence of lawns in the area. The following coatings are common:
- Stone (quite traumatic in case of falls).
- Sawdust, shavings (soft when falling, but with a risk of splinters).
- Crushed stone (soft and comfortable material for use).
- Sand (also a very convenient material for children's games).
- Modern safe, non-toxic rubber coating: non-slip, soft and warm in the summer.
If you plan to organize a sandbox, you need to think in advance about the method of delivering sand to the site (where the car will drive up, from where it is easier to drag sandbags).
A children's small house can be built from timber, you can even cover a toy roof, like a big house. Children will definitely appreciate this mini-copy. If you want to solve this issue with the least effort, get a single or double tent. In the absence of space or the desire to build a stationary house, it will do for an interesting gaming place.
For boys, you can arrange a place for role playing: a mini workbench, like dad, or garages for his cars. The girl will also like role-playing games: an impromptu showcase of the “shop”, a miniature “summer kitchen” will surely appeal to little housewives.
Advice! In order for the house to serve you for several years, you should not save on processing timber and protecting the building from rain and fire.
Shouldn't bet children's house closer than 4-5 meters from other buildings in order to maintain fire safety.
 Playground with pool
 Basically, such playgrounds are intended for games in the warm season, so even a stationary or water pool can be placed there. But if you're counting on a visit country house with children in winter, it is important that on or near the site there is an opportunity to build a snow fortress or an ice slide, as well as to make a snowman.
In addition to the standard, you can use unusual materials for the construction of playgrounds. Let's give some examples.
Plastic bottles. Filled with air or pebbles, they can serve as a side for a sandbox, building material for the walls of a house.
 House of plastic bottles
 old tires. You can use these elements for fences, flower beds.
 Old playground tires
 Waste boat. It will serve as an excellent option for a sandbox or a place to play.
 Option to use an old boat
 ropes. They will serve not only for the decor of the site in a marine style. You can arrange a mesh with knots or a rope from them in order to climb a hill.
 Ropes: decor and projectile for games
 Attention! When playing with ropes, as well as on high altitude, it is necessary for children to observe safety precautions and the presence of an adult nearby.
It will be very interesting if you decorate the site in the style of a fairy tale. Let your imagination run wild with your kids!
Playground for children: photos of interesting options
A house, almost like a real one, and a fence made of old tires. 
Completely wooden deck. 
Sandbox made of logs and a place where you can climb. 
Playground: related video
Conclusion
The design and construction of a children's play area is an important point; it is worth paying attention to it even during the layout of the plan of the entire site.
Children are full-fledged members of society, and adults need to pay enough attention to them. Remember that even the most beautiful, filled and properly built playground in the country will not replace the kids for real, sincere communication with you.
Do you think children's play is unsafe? Are you afraid that your child might get hurt while looking for adventure? The best way out of the situation is not to ban, but to provide a safe place to play! Moreover, making a children's slide with your own hands is not so difficult. To do this, you need a minimum of material, a construction tool and a little imagination. And you will find practical advice on construction, drawings of structures and recommendations regarding the choice of building materials below.
What you need to know to build a children's slide
The proverb about the need to measure several times before cutting off is especially relevant when building a play complex for a child. After all, mistakes in this matter are unforgivable!
Playground slide with swings
Five golden rules for the game slide
First of all, a children's slide should be safe and comfortable:
- The descent must necessarily have a “brake platform” - a section where the slope is parallel to the surface of the site. Otherwise, the descent speed will not decrease, which may cause injury to the child.
- The length of a do-it-yourself children's slide should be exactly twice as long as the height of the structure. So, if the length of the slope is 5 m, the height of the launch pad cannot be more than 2.5 m.
- Within a radius of 1 m near the descent zone there should not be any buildings or fences. This is necessary so that the child cannot hit, having accelerated strongly.
- It is necessary to provide a special coating in the descent area (sand, rubber mats, etc.). In rainy weather there should not be a swamp!
- If a sandbox or a hammock is placed under the structure, you need to sew up the “ceiling” in advance and make a roof over the launch pad (to drain water). Otherwise, sand from children's legs will fall on the heads of those who are located below.

How to choose material for a slope
The choice of materials for covering the descent is not so great. And, given the requirements that ensure the safety of the child, it is completely narrowed down to several options. But, before listing the features of these materials, let's figure out what it is impossible to make a children's slide from with your own hands:
- Polycarbonate (especially cellular). This material, firstly, does not slide well, and secondly, when broken, it forms dangerous chips. In addition, in the summer, polycarbonate expands, forming waves. Therefore, the slide in hot weather will quickly become unusable.
- PVC panels. A very fragile material that is not able to endure harsh winters.
- Glass mats. Categorically not recommended for contact with the skin of a child.

Winter slide made of monolithic polycarbonate
How to achieve a "mirror" wood surface
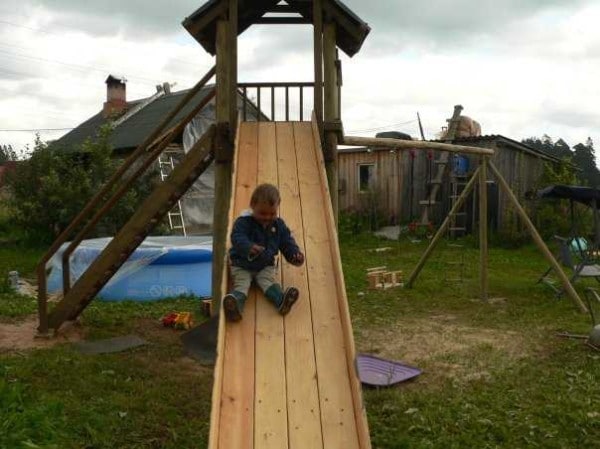
Building a wooden children's slide with your own hands is a reality! But only if you are willing to set aside a few days to make a slippery wooden ramp. Indeed, in order to apply several layers of yacht varnish and sand the surface in between applications, it will take a lot of time.
What is attractive wooden slide
Advantages of a wooden slide:
- The child will be surrounded by environmentally friendly, natural materials.
- The surface will not heat up as much in the heat as, for example, metal.
- In winter, a wooden slope can be filled with water and turned into an ice slide.
Disadvantages of a ramp made of wood:
- If there is sand on the site, then the varnished surface will become unusable very quickly. Children will bring sand on their clothes and scratch the stingray with it like sandpaper. So be prepared to renew your coverage every year!
- The slightest oversight while grinding the surface - and the baby is provided with splinters and scratches after riding.
- In any case, the sliding speed on a wooden surface will be low, which will quickly make a wooden slide uninteresting for growing children.
- In the summer, it will not be possible to convert the slide into a water park, that is, to supply water to the ramp.
A selection of drawings of a children's slide made of wood for DIY:

A simple drawing of a wooden slide

Low slope for small children

Game complex with a slide

simple model
Advice! Instead of wood, it is better to use Finnish plywood to cover the slope of the slide. It is much more moisture resistant and perfectly tolerates the effects of precipitation.
Secrets of the slippery surface
A few secrets on how to make a children's slide made of wood really slippery:
- Wooden descent (dry and sanded) can be coated with a special oil that protects the surface (for example, "Pinotex"). This must be done in several layers. Thanks to this procedure, the tree will not lose its smoothness, and moisture will roll off well without destroying the surface.
- Layer-by-layer sanding of the wood after each application of varnish will help to achieve the effect of a mirror surface and make the slide really slippery.
- Plywood slope can be covered with liquid acrylic used to repair bathtubs. In addition to excellent glide, this option is also good because you can choose almost any color of the coating! But it should be remembered that scratches form quite quickly on it, into which dirt will invariably accumulate. This will not affect the functionality of the slide, but appearance designs will be damaged.

Escape from polished wood
Advice! The joint of plywood sheets looks much more aesthetically pleasing if their edges are sawn off with a jigsaw at an angle of 45º. In this embodiment, the sheets are arranged as if overlapping, and one element “creeps” onto the other.
Metal coating - we take care of the safety of the baby
A ramp made of stainless steel or galvanized sheet is a “classic of the genre” during the construction of a do-it-yourself children's slide. But this solution also has its drawbacks.
- Firstly, in order to cover the entire hill, it is necessary either to overlap or spend money on a much more expensive sheet of larger metal (2.5 and 6 m long sheets are commercially available). There is a third option - to allocate time for the search construction company, which agrees to "cut off" the necessary piece of stainless steel from the existing roll.
- Secondly, stainless steel (like other metals) gets very hot in the sun. Therefore, it is recommended to place the ramp on the north side in order to reduce the intensity of lighting of the structure. But such a layout is not always possible on the site!
- Thirdly, thin steel is very sharp and completely unsafe for a child. An inaccurately bent corner can cause serious injury to the baby! Therefore, it is necessary to bend the sheet very carefully, firmly fixing it to the base shield.

Metal slide with handrails
Advice! Instead of a galvanized sheet to cover the slide, you can take an alucobond (aluminum panel) and attach it to liquid nails. The advantage of this solution is a wide color palette of the material!
Secrets of a good metal slide:
- The shield under the stainless steel sheet should be perfectly flat, without protrusions and drops. After all, stainless steel is extremely thin and does not compensate for surface flaws. For this, it is better to pre-sheathe the boards of the structure with fiberboard boards.
- It is not recommended to buy mirrored stainless steel, as it heats up much faster and more strongly on sunny days. A much better option is polished stainless steel.
- The sheet should be much wider and longer than the slide itself. Indeed, for the safety of the child, this coating around the entire perimeter must be bent and hidden under a kind of baseboard or board.
Advice! It is necessary to fasten a sheet of metal only along the edges (to the sides and bottom). It is absolutely impossible to make fasteners on the surface of the slope of the slide!
Slide from flooring - cheap and cheerful
Another interesting and inexpensive option is to cover the slide with a sheet of linoleum. The advantages of this solution are obvious:
- the material is relatively cheap (you can buy scraps that are sold at half price);
- under linoleum, a perfectly flat surface is not needed due to its thickness and softness;
- the base does not rot under this material, it protects the tree from moisture and temperature changes (if linoleum is on the sides, in summer the slide can be made water);
- linoleum softens impacts and does not form dangerous sharp corners, chips or splinters, like other coating options.

Linoleum slide suitable for home
But such a slide has enough disadvantages:
- the coating must be changed annually due to its rapid wear;
- in very hot weather, linoleum can melt, which is dangerous in terms of getting burned;
- the sliding speed on this material is quite low;
- the design with linoleum does not look very aesthetically pleasing.
For optimal glide, you can provide felt or felt mats for skating.

We build a wooden slide for a child - step by step instructions
The dream of every child is a multifunctional playground with which you can realize any ideas for games. So, step-by-step instruction to build a children's slide with their own hands.
Competent preparation is the key to successful construction
Preparatory stage:
- Remove fertile soil at the construction site and level the soil. Fill the site with sand and let it settle, compact (it is advisable to complete this stage in the fall, and start building the slide in the spring).
- Prepare wooden blanks (kosour, railings, boards for steps and "tunnel", timber for the base): if necessary, dry everything, saw it to the selected dimensions and carefully sand it, and then impregnate it with a protective mixture.
- Paint steps, handrails and boards for the “tunnel” with multi-colored enamel in 2 layers with intermediate sanding.
- From the 12th plywood, cut out the side elements (for lining the tunnel) and the sides of the slide. Treat the elements with impregnation.


Technique for mounting the base of the structure
Frame installation:
- Build a foundation. To do this, it is necessary to make holes with a garden drill, install reinforcement in them according to the level and fill everything with concrete.
- Weld the corners to the reinforcement. In the pillars for the base of the slide, make cuts and mount the timber on the corners, securing everything with self-tapping screws. Connect the poles to each other with braces.
- Make a ladder: fix stringers (preferably added on the back side of the board for additional structural rigidity), fill steps on them.
- Mount the launch pad to which the ladder leads.
- Next, make a base for the descent from a bar and install a curved metal profile (25x40) for the ramp.

Bearing structures
The final stage - we finish the construction
Do-it-yourself ramp and sheathing for a playground for a playground:
- Lay a plywood shield on the base for the slope and make a galvanized iron flooring. Along the perimeter of the sheet, bend and attach from below to the metal profile. In the boards that form the platform, cut a gap and also wrap the iron flooring there.
- Under the slope, make a tunnel from the boards. Sew up the sides with plywood.
- Install the sides on the slide and the railing on the stairs.
- Mount hipped roof and cover it with pre-treated plywood.
- Sew up the side parts of the structure with plywood sheets and cut holes in them for a climbing slide.

Organization of the slope and sheathing of the slide

Creative slides - we make the dreams of a child come true
Children's imagination is strong and sometimes incomprehensible. In the imagination of a child, even the simplest hut can easily turn into a beautiful castle! Therefore, for fun, a simple descent with a ladder will be enough for kids. However, there are a lot of options on how to make a children's slide with your own hands in an extraordinary way and with fiction - examples in the photo.

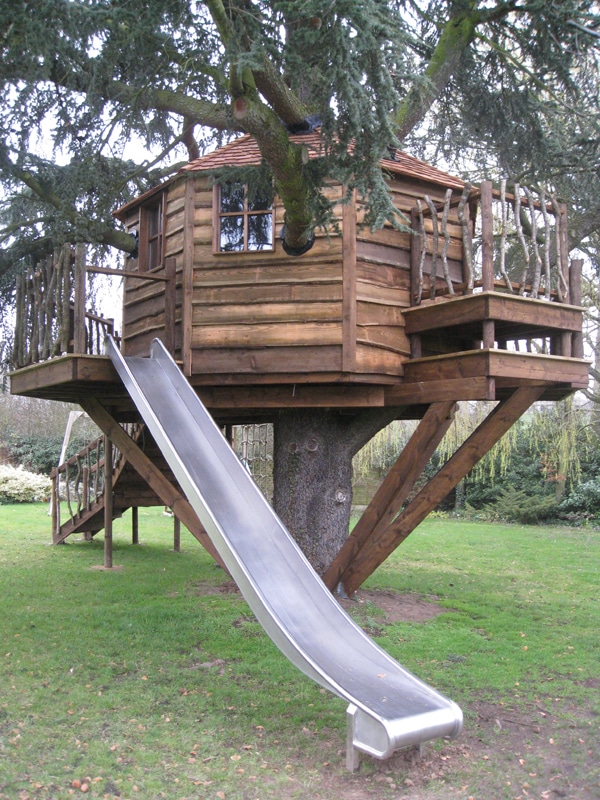
Downhill Treehouse

Protected by a stone lion
Advice! In order to keep interest in the slide for a long time, it is desirable to provide additional entertainment elements on the launch pad.
The playground is the dream of every child aged 3 to 13. And in order for the play area to meet the changing needs of children, you need to think through all the details at the planning stage. For this, you may need to invite a specialist who will save you from having to make a children's slide with your own hands. And then a real gaming complex will appear on your site - safe and comfortable.
Video: do-it-yourself children's slide
Do you want to please your child? There is nothing better than building a playground for children! Think back to your childhood. Didn't you like to spend time in the sandbox, slides and swings? Here, probably, it was like everyone else - your children's heart simply rejoiced! So, why not please your children with a wonderful playground where they will play and have fun? And you can make your childhood dream come true with your own hands!
Where do we start? Naturally, with an idea! You will also need time, patience, diligence, some knowledge and some funds. Yes, just a little money, you should not think that the playground is expensive. Not everything beautiful is measured by money, and in the construction of a playground, you can use everything that is not so on the plot.
We draw up an action plan

In order for the idea to have any shape, you will have to develop a plan of action. If you have a good memory, then all activities will be stored in your mind. But for more persuasiveness, you can create a project that will allow you to clarify the details with household members. Also check with your children. Tell them about your plans, maybe they will make some changes to the project. And, in the end, who will spend time on the playground, if not them?!
First of all, think about where exactly on the site the site will be located.
There must be both sun and shade. After all, it is not very useful for children to be in the sun all day, as this can threaten them with sunstroke. In addition, the place you choose should be protected from the wind.

Excessive distance from home is also not welcome, because it is better that children are always visible to adults. It is also worth guarding against the great children's curiosity.
The playground should be located on a more or less level surface. This will protect children from injury.
Do you want children to be able to run barefoot around the playground? Then take care of the improvement of the green grass rug.

Raspberries, rose gardens, brambles and other thorny plantings should be kept away from the playground. If you plan to develop a love for sports in your child, then you can equip it with rubber tiles, which are not traumatic and aesthetically attractive. In addition, install a basketball hoop, horizontal bar and other sports equipment on the site. If you can allocate some space for the site, then consider creating a gravel garden lined with small pebbles. Children love to play with gravel as much as sand. On a scale diagram, depict all planned objects.
Safety

If you decide to make a swing, then keep in mind that they need an additional free place- not less than 2 m. To protect the child from injury, take care of the coverage on the playground. It could be a green grass rug. But if you wish, you can also use a synthetic coating sold in specialized stores in your city.
Swings, slides, houses and other structures deepen into the ground no less than 0.5 m. They should also be carefully strengthened, for example, with metal “crutches” or concreting. Any reliable method will be appropriate here.
If you are using wooden parts on the playground, sand them thoroughly beforehand. Then cover them with frost-resistant paint or varnish.
The size of all structures must be appropriate for the age of your children. For example, a sandbox with a size of 1.7x1.7 m is enough for 2 and 5-year-old kids, and the height of the slide should not exceed 1.5 m. If your children are younger school age, then the slide for them can have a height of 2.5 to 3.5 m, a swing - from 2 m.

Whatever you come up with, the mandatory attributes of each playground are sandbox, swings and slides, a children's hut or a house. And remember, first of all, it is important to follow safety precautions in order to minimize the possibility of children getting injured on the playground!
We are building a sandbox for kids. Consider important!

The main types of sandboxes are limited to only two options: closed and open. But here you can bring your exclusive ideas to life!

To create a unique sandbox that is different from its traditional counterparts, you can use the following ideas:
- Sandbox that is easy to assemble and dismantle. To do this, pick up about 40 of the most identical stumps. Treat them with an antiseptic and dig into the ground. Here the shape of the sandbox can be very different. Everything here rests on the scale of your imagination. For example, you can create small sand paths that your child will run along.
- Tractor tire sandbox. It can be equipped in the form of a sailboat. To do this, select a wooden stick that will serve as a mast. Then fasten it to the tire, and decorate with a sailboat.
- Sandbox in the form of a table. Such unusual solution will be the workplace of the crumbs. Here the child will be able to create sand houses and sculpt different figures.

If you decide to make an open sandbox, then, first of all, you need to prepare a place for its arrangement. Then dig a hole. The most common size is 2x2x0.4 m, the last digit here indicates the depth of the pit. After the recess is ready, make a pebble, crushed stone or rubble pillow that will serve as drainage for the sandbox. At the corners of the pit, drive in 4 bars that serve supporting pillars for construction.
Now nail planed boards on all sides. Of course, they should first be impregnated with an antiseptic, and then painted with frost-resistant paint or varnish. If you want to create seats in the sandbox, then on the edges of the nailed bars, fix a few more horizontal boards prepared in advance. Now the design is ready. It remains to fill it with sand with a layer of about 20 cm.
It is better to use quarry, river or store sand. This is due to the fact that it is in these types of sand that the minimum amount of construction waste, such as stones, glass, etc., is found. Before pouring sand, pass it through a special fine mesh sieve.
If the open sandbox does not suit you completely, then you can make a closed version of it. To do this, you will need planed boards with a length of about 1.2 m (4 pieces), as well as a meter bar that needs to be sawn into pegs. In addition, door hinges, agrofibre and plywood sheets will come in handy.

So, when building a closed sandbox, you need to repeat the same processes as when arranging open sandbox up to and including the moment when you nailed wooden boards on all sides of the pit.

After that, nail another tier of boards to the support bars. Now you can start making the roof. To do this, measure the sides of the constructed sandbox and cut out the corresponding dimensions of the plywood sheet. Cut the finished sheet in half and screw the hinges to it.

Attach agrofibre to the sides, it should be spread on the bottom of the sandbox. Attach both plywood sheets to different sides of the structure using loops for this. Thus, you will fix the agrofibre. Now the roof of the sandbox will be ready! Paint it in a bright color, and after the paint dries, pour in the sand. Now kids can play in their new sandbox!

By the way, the roof can also be made of wooden boards. Simply put, it should be done according to the principle of a door consisting of two parts.
The main advantage of a closed sandbox is that it is protected from small debris. In addition, cats and dogs will not be able to arrange a toilet for themselves in it.
A few more ideas:
We equip a house or a children's hut
Children are very fond of secrets, hiding from the whole world and creating their own secrets. If you are a skilled craftsman, then creating a house from the boards and roofing material remaining on the site will be within your power. But if you wish, you can also buy a finished structure, for example, made of plastic, wood or fabric.

There will be no limit to the happiness of children if you make a tree house for them. However, for this it is necessary that the site has a tree with spreading branches. Yes, and the house must be positioned so that it is safe for children. But, believe me, your children will rejoice at its most primitive analogue, made of fabric.
You can make a simple hut from branches, sanded boards, or ordinary stretched bedspreads. To put it simply, lay out an ordinary tent for the children. It is well ventilated and protects the children from the scorching sun on hot days. summer days. The only limitation is that the film house in it will keep your children in a greenhouse that is hazardous to health!
If you decide to build a fabric house yourself, then first make a frame for it. It is recommended to make a prefabricated frame. Its main advantage is the ability to quickly remove it if it starts to rain. You can also quickly install it when sunny days come. If you are not limited financially, then it is better to buy a ready-made fabric house, which is equipped with windows, chairs, loopholes, pull-out tables and other useful accessories. Although you can do all this yourself, of course, if your imagination works and you have the appropriate skills.

Maybe you want to make a house for your child that resembles the one in which your family lives? Then you will need stronger materials. Wood, plastic and foam are best suited here. The house can be ground, on pile or wooden legs.
If you decide to make a house for the baby at a height, then do not forget to make a ladder, a rope and loopholes for it, thanks to which the baby can climb inside the structure.
To create coziness, complete the house with a slide, a hammock and a table with chairs.
Swing. We make them comfortable and attractive!
Creating comfort on the playground, do not forget about the construction of a low rocking chair, which can be made in the form of fabulous animals, such as a pony, a sheep, a cockerel or a donkey. Making a rocking chair is not so difficult.
To do this, you will need a concrete mortar, a shovel, a large spring and a figure of an animal that your baby will saddle. First, dig a hole for the foundation. Fill it with mortar and insert the spring into it to a depth that ensures good stability of the future structure. After the solution has cooled, attach the figurine to the upper edge of the spring. It is important that it is equipped with a seat, because this way you can ensure the safety of the child when rocking.

If you limited yourself to arranging a classic swing, then you need to prepare 2 beams with a length of 3 m in advance for this. In addition, you will need a galvanized pipe with a diameter of about 7 cm. You also need a rope and a seat with a back. First, dig 2 holes. Install pre-treated wood blocks in them and fill them with concrete mortar. After the base has hardened, fasten a galvanized pipe to the top of the rungs, to which you will later attach the ropes with the seat. To ensure greater safety, take care of the seat angles. It is better that they have a streamlined shape.
A photo