
Do-it-yourself summer water supply in the country
Many owners of country houses start building a country house only after they have brought water to the site. Even during the construction of a frame country house, in which it seems that water is not needed anywhere, there will always be a place for concrete and mortars for "gravy", "grease", foundation construction work, which means water will also be required. In addition, water, as the basis of life, will always be found when using our 6 acres for its intended purpose. Watering the garden and vegetable garden, washing the car, the paving slabs of which are paved in the yard, and of course my own washing. So the supply of water to the summer cottage is a paramount issue - that is why in this article we will try to consider the maximum number of issues related to the water supply of the summer cottage and the plot.
If a central water supply system passes near the site, the solution of the problem is not always significantly simplified. Soviet water pipelines are dilapidated and almost completely worn out (recently, when replacing an old water supply system, a comrade dug up a cast-iron inlet pipe with the stamp of 57 - the cast iron literally crumbled into pieces in his hands). And new water pipelines are rarely laid in modern Russia, it is very expensive, and in order to achieve this, one has to apply almost directly to the President (everyone probably remembers the story of the woman who turned to him for help in this matter).
Therefore, in order not to depend on someone's goodwill and use water as much as necessary, the summer resident has only two options: a well or wells, although, by the way, many experienced summer residents combine both options - even more substantial savings are obtained.
From the list of solutions to the issue of country water supply, we excluded the use of natural reservoirs in advance - you yourself know what kind of ecology, it can be scary to use not only for the kitchen and for irrigation, and despite the fact that the Slavs have always tried to build dwellings near the water, they are far away from the dachas not everyone cares.
Criteria for choosing the type of country water supply and water supply
Here, as in the well-known proverb, you need to measure everything seven times, that is, calculate in advance how much water you will need for normal living at the dacha of the whole family, and do this even with a small margin.
The calculation should be made taking into account all points of water consumption and water intake, taking into account the amount of their constant use by all family members. The most water-consuming objects should also be taken into account - a sauna, a bathhouse, a pool in the country, the area of \u200b\u200bthe site allotted for growing vegetables, an orchard, which in some regions is now difficult to grow without irrigation.
With each liter of water counted in water consumption, the proposed future source of water supply should also become more abundant.
When locating a water supply source, be sure to take into account the fact that every ten meters of the pipeline will reduce the pump head by 1 meter. This is necessary so that water can be delivered to the most remote corners of the site, garden.
With a small flow of water - for example, if you use the house only as a summer home and a place to relax, you can make a shaft well. It is easy to build, relatively inexpensive, and all the work on its device is easy to do with your own hands. It is fed with water at the expense of groundwater, the depth of which varies from 4 to 15 meters.
The device of a mine well is the simplest: a cap above the ground, underground reinforced concrete rings or a frame made of wooden beams, usually 25 cm thick.
The shaft of such a country well should be deepened into the aquifer by 3, and even better by four meters. At the bottom of the shaft well, soybeans of sand, gravel, crushed stone, each of which should be 20-25 centimeters thick, are alternately poured, and later they will act as a natural filter to purify the incoming water. Many, in addition to the bottom flow of water, also make holes in the concrete rings so that it comes from the sides. After that, a submersible pump is installed at the bottom.
The amount of water that a shaft-type well can provide cannot, of course, be calculated in advance. Whether it will be possible to do this after its construction - for this, the initial volume of water that has entered it by gravity is calculated, after which it is pumped out with a pump and the time is measured after which it will be filled again to the previous mirror.
In principle, it is always enough for a normal water supply of a summer house, they also dry up extremely rarely, in my practice of a “shabashnika” this happened only a few times, and even then after pumping out the water and cleaning and disinfecting the well, the water began to flow again.
If the groundwater is deep.
If a suitable aquifer is located at a depth of more than 15 meters and deeper, then the option with a well is eliminated, in which case a well will have to be drilled. They are drilled "on sand" and "on limestone". Let's explain:
Drilling a well in sand is much faster, much cheaper, and so much easier that if you borrow a tool from someone, even an inexperienced person can handle this job.
To construct a well in the sand, only a pump, a filter mesh, and a steel casing with a diameter of 125-133 mm will be needed.
Drilling a well "on the sand" takes no more than two days. Such a well will provide you with a volume of water equal to a cube per hour. This is not much, but it is enough for most site owners.
Among the disadvantages of drilling a well “on sand”, it can be noted that the water from it is not very clean, and, therefore, the well will “silt up” over time. As a rule, even if it is not used very intensively, the life of the well “on sand” is 4-5 years.
Artesian well or limestone well it is expensive, it takes a long time, 90% of summer residents will not be able to drill it on their own, but ... It serves for a long time, from 30 to 75 years (depending on the amount and concentration of suspensions), it can give out "to the mountain" from 5 to 100 cubic meters of water per hour ( at a depth of 30 meters).
Drilling artesian wells or wells "on limestone"
The most commonly used method is to run the casing to the limestone layer through the clay layers. The next stage is the “opening” of the limestone layer, which is drilled with the so-called “open hole”, to the very aquifer.
In order to avoid damage to the rock through which surface water can penetrate deep into, grouting is used, which consists in pouring a small volume of cement-sand mortar through a special steel pipe under the limestone layer. There is such a peculiar filling of cracks through which contaminated surface water could get into the "artesian".
By the way:
This type of wells is even required to obtain a special "well passport".
Using the so-called European well drilling technology (so-called because the same technology was used a long time ago in some regions of the USSR), the well device is of a two-pipe nature. The first pipe with a large diameter stands on the limestone itself, after which a well is drilled with a final, working diameter. In order to avoid contamination of the artesian well with surface water, a compactonite clay sealing plug is made between the two types of used pipes.
Such a well will cost more than an ordinary one-pipe well by more than 50%. As a rule, several neighbors drill them together, but even that comes out all the same expensive. Their very existence at such a cost is explained by the very high quality of water.
Lifting water from a well or well
So, we got to the rise of water from a well or well. To establish the supply of water from a not very deep mine well, the vast majority of summer residents use surface pumps. The main condition and application is the distance from the water source to the house: in most designs of such pumps, it cannot be more than 50 meters (or rather, it can - there will be no sense).
If the well is deep, or a filter well is used to extract water, the same surface pumps, but already ejector ones. More often, submersible well pumps are used, which can easily “master” a distance of 40 meters (depth).
Well, if you are a happy owner of an artesian well, then you will have to use a submersible borehole pump, which is quite capable of lifting water from a depth of 100 meters.
If there is a desire to automate the whole thing, then you will have to resort to buying a CAB (autonomous water supply system), which consists directly of the pump itself, a hydraulic accumulator and a control pressure switch. The thing is great but expensive for many.
Pros and cons of different methods of extracting water
1. mine well. (Number 1 on the drawing-scheme)
The work is labor intensive. Despite the fact that much of its construction can be done with your own hands, you will have to call in equipment and assistants, at least at the stage of digging, removing the earth from the well space and lowering concrete rings there.
The advantages of the shaft well design are obvious: the possibility of self-repair, cleaning and disinfection as such a need arises (it may not occur for decades - it all depends on the place). It is recommended to resort to a shaft structure in dachas and areas with a close level of groundwater.
2. What is driving or otherwise Abyssinian well.(Number 2 on the drawing-scheme)
This is a design in which a steel pipe is hammered into the ground until it reaches the underground water table. On its lower link there is a filter and a head with holes made in it, through which the water will actually get inside this very steel pipe and be pumped out from there by a pump.
3. What is well chamber. (Number 3 on the drawing-scheme)
The option that people move to the dacha for permanent residence and give their apartment (or rent) to the young is not uncommon now - therefore, water is constantly needed. In this case, a well chamber is built to protect electrical appliances from the effects of precipitation. The chamber is easy to build with your own hands from the same concrete rings or blocks with maximum waterproofing. Cover required.
4. What is drilling well(Number 4 on the drawing-scheme)
This is such a water supply device when a well is drilled to the groundwater table. Then, to a depth of 7-8 meters, an ordinary sewer pipe (115 millimeters in diameter) is mounted in it, after which, using a filter segment (such blue polyethylene pipes), water enters the pipe and climbs up.
Water supply from a well - both cold and hot: how to do it?
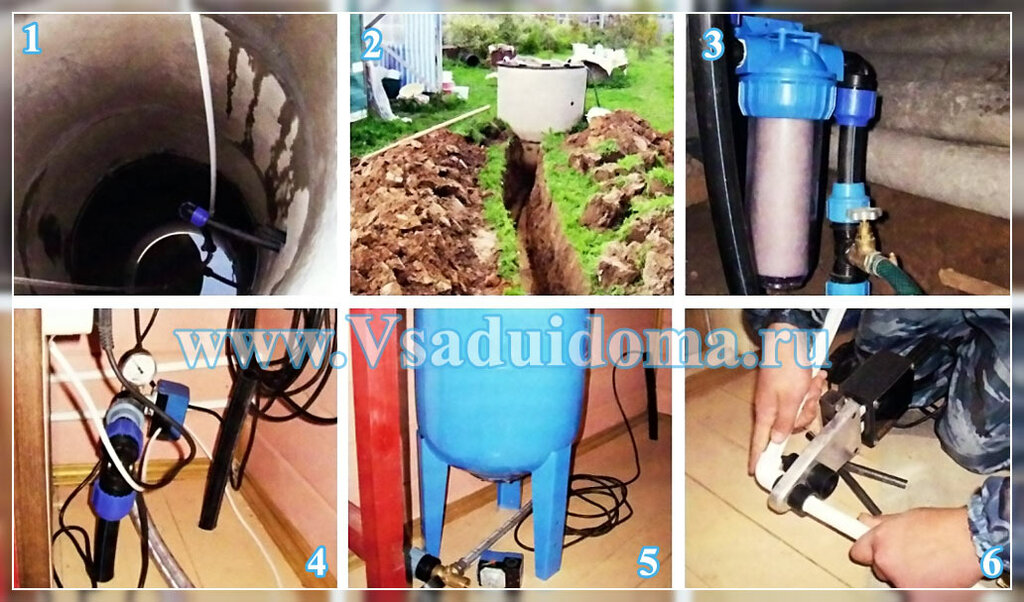
If there is already a well in the dacha (maybe dug with your own hands or maybe left over from the previous owners), then at a relatively low cost, you can organize not only cold, but also hot water supply at home. In our case, an inexpensive submersible pump "Aquarius" was used to lift the water. The pipe exit from the well is waterproofed with silicone and cement. The distance from the well to the house is 5-6 m. So that there is no stagnation of water in the system, a valve is placed at the lowest level of the network.
We conduct water with our own hands - step by step
1. Using a cable, lower the pump into the well, avoiding tension on the power cable and supply hose. Fixed the cable to the surface. A cap for water intake was installed on the supply hose.
2. We supply water to the house through a polyethylene pipe stretched along the bottom of a trench 50 cm deep. At the same time, a second pipe was laid, inside which an electric cable was passed.
3. The supply pipe was connected to - the further part of the water supply using a check valve to prevent the water from draining back into the well. A mechanical (coarse) filter was installed.
4. Bring the supply hose into the house. A pressure switch, a pressure gauge and a fine filter were installed on the inlet dispensing unit. Connected everything to the mains.
5. After being cleaned and filtered, the water enters the accumulator, which maintains the required pressure in the pressurized water supply system, saving the time the pump is turned on.
6. From the distributing unit, wiring was carried out along the walls of polypropylene pipes. The bathroom has a shower, sink and water heater.
More about the device of the well.
Every summer resident who is puzzled by the question of its construction should know the requirements for the “correct” well.
Often, in a suburban area that is not connected to a centralized water supply, cottage owners have to drill a well or dig a well. The task is not easy. But even in the event of a power outage, the well will provide continuous water supply.
With a relatively small depth of groundwater in the area (up to 40 m), shaft wells are constructed, water enters them through the bottom of the well (90%) and partially through loose wall joints (10%). The usual depth of such a well is 10-15 meters.
Signs and signs of the close occurrence of groundwater
1. The surest sign (unfortunately of course) is water in the basement, cellar.
2. The proximity of natural water bodies - lakes, rivers.
3. Dense evening fog in the absence of water bodies.
4. Juicy dense grass even in hot summers, not withering in the heat.
5. Plants in the area that need a lot of moisture.
6. Midges and mosquitoes in the air after sunset
7. Mochar on the site and covering the ground in some places with a light layer of moss.
How to start making a well
The best time to dig a well is autumn. In autumn, as a rule, the groundwater level is the lowest. Otherwise, you can “under-dig”, and the well will come out dry.
If the site is hilly and has elevations and bumps in the landscape, then the highest place is better for arranging the well - it sounds strange, but it's right, and here's why.
According to the laws of gravity, surface water, which most often pollutes the well, will flow away from the well, and not towards it, therefore the water in the well will be cleaner. Avoid the banks of rivers and places with a sharp change in terrain due to possible fluctuations in the level of groundwater. The minimum distance from sources of pollution (cesspool, parking lot, toilet) is 25 m, from the house - 4-5 m - this requirement must be observed.
Despite technological advances, digging wells is still manual labor. The walls are traditionally reinforced with wood, concrete, stone or brick. The sinking process has become much simpler with the advent of reinforced concrete rings (more often they use rings "KS 10-9" or similar ones with a height of 0.9 meters and a diameter of 1 meter).
The initial ring is mounted on the bottom of the prepared pit, the next ones are added from above one by one as the soil is excavated from under the bottom one, which gradually settles. One or two rings are installed in the aquifer. After that, the joints are sealed with mortar, and the bottom is covered with a layer of gravel or gravel 20-30 cm thick - it serves as a filter for incoming water.
The space around the mine is covered with gravel and sand, and starting from the depth of freezing of the soil, a so-called “castle” is made of clay, which is needed to prevent surface and especially melt water from entering the well.
Packed clay is an excellent water seal, so additional waterproofing is not needed. On top of the clay, a concrete pavement is made with a hard surface and a slight slope for drainage. A well shaft made of concrete rings is absolutely waterproof for groundwater, so with proper construction, you will always have clean water in the well.
Do-it-yourself well - drawing 1 and photo
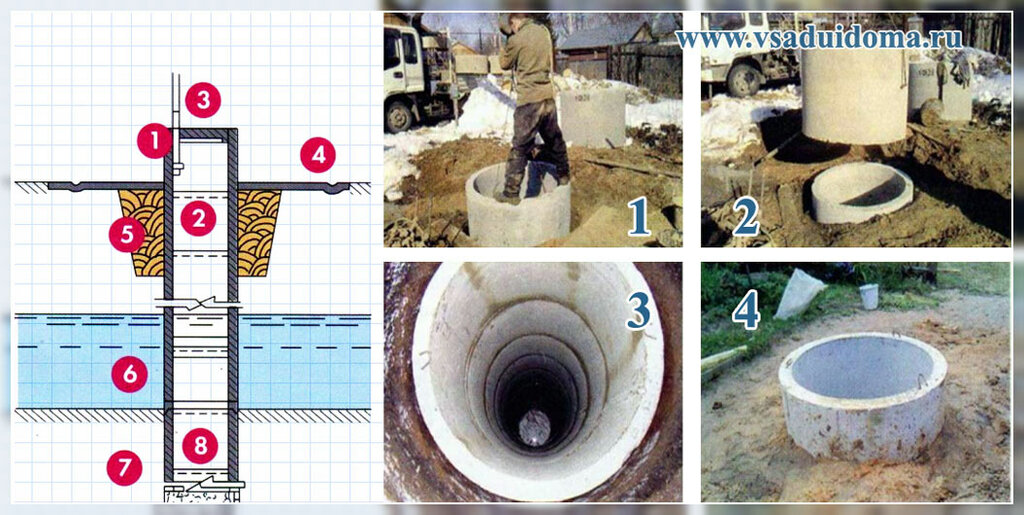
On the diagram-drawing in numbers:
- cap
- rings
- ventilation tube
- blind area
- clay castle
- aquifer
- waterproof soil
- reservoir
In the photo (on the right), in numbers, the stages of building a well from concrete rings:
- Laying the first ring
- Installation of the second ring
- Sealing with mortar
- backfilling
We make the head of the well
As soon as the last ring is installed and the water level in the well is sufficient, we take up the construction of the ground part. The original and beautifully designed cap (outer part of the well) will be a worthy decoration of your site.
The head should protrude above the ground by about 1 m, and the shaft itself should be closed with a lid. A roof is erected over it in the form of a closed house, a canopy or a gazebo. A well-made roof will protect the well from dust, precipitation, foreign objects and foliage.
Gates of various designs, manual or mechanical pumps are used to lift water. Cranes - lifting devices popular in villages - are too bulky for small suburban areas, therefore they are rarely used here.
Shaft well - installation of a "log house underground"
The installation of an ordinary, mine well with walls made of timber or logs is done by simply digging the soil under the log house.
Logs for logging a well must be taken of high quality, waste from the bathhouse or other residues after construction will not work.
Be sure to check the logs for mold, wood beetle grinder, fungus, etc. The forest should be taken only dry and nothing else - the opinion “it will get wet anyway” is erroneous.
Typically, the thickness of the forest for the installation of a well log house according to the mine type ranges from 20-22 centimeters. I think that the forest intended for these purposes should be cleared of excess bark and knots.
To facilitate installation, the crowns of the log house must be assembled on the surface by making the usual log marks. After that, the crowns are disassembled in a strict sequence, so as not to confuse the queue during assembly, and lowered into the shaft, where they are tightly adjusted on the spot.
At the next stage, in the middle of each of the 4 sides of the log house, a sample of land is made by 25-30 centimeters, after which the pores at the corners of the log house remove the supports in turn. The supports released from under the corners are brought to the places where the soil was chosen from and fixed there, again, in turn. Now they dig out the soil at the corners of the log house, as a result of which the structure lowers, and this work must be repeated until you reach the groundwater level.
The gap that is formed between the walls of the log house and the pit (from the outside) is covered with the same soil that was taken out of the pit and rammed as tightly as possible. After that, you can go down into the well shaft and trim its walls.
What should be the taste of water from a wooden well
The taste of water in wooden wells largely depends on the wood. It is better to choose alder, linden or birch: the flavor will be almost invisible. True, these breeds are durable. A log house made from undried pine will give the water a resinous flavor. And the water from the aspen well is slightly bitter at first. Most of all, larch is used for the construction of wells. She, like oak, does not give any "suspicious" smells and serves 20-25 years.
Well care
Inspect and, if necessary, clean your well, it is necessary to do this according to the recommendations of the old “well affairs” masters at least twice a year.
Garbage can also be removed with a bucket, but it is better to prepare a long pole in advance with a hook on one side and a stack like a net on the other.
We think it is unnecessary to say that one should not climb into the well alone.
Before descending into the well, check its gas contamination.
The general rule of working in a well is to check its gas content, it is always recommended to do it, regardless of whether there is a gas outlet or a swamp nearby. The easiest way is a candle on a string: it burns evenly - everything is fine, the flame fluctuates and gradually fades - there is gas, but it is not much, and if it goes out, then there is a lot of gas and you can’t go down.
If the well is old...
In practice, if you bought a plot with a well in the secondary market, then you cannot use the well - it must be cleaned, you never know what the old owners dropped there (well, if not on purpose - people are different, especially in our time).
An old well should be thoroughly cleaned by pumping water out of it. Pump out water gradually: after lowering the water level by 30 centimeters - half a meter, start cleaning the walls, then pump out the same volume of water again and continue cleaning, and repeat until you reach the bottom, which needs to be cleaned especially carefully.
After cleaning, the well and the outer house are disinfected with a 10-15% bleach solution: the walls are impregnated with it 2-3 times. Then the remains of the solution are poured into the well, mixed with water and in this state for 24-48 hours. At the same time, the head of the well is carefully covered with a tarpaulin so that chlorine does not evaporate. The first water that fills the well after cleaning must be pumped out.
On a note:
When digging a well, the approach of the aquifer is determined by a noticeable cooling: the air temperature in the well drops by a couple of degrees, and mini-fontanelles appear on the walls of the mine.
A well is a sacred place, a place of almost all peoples. For Christians, on the eve of major church holidays (Easter, Christmas, Epiphany), the water in the well was considered miraculous. They washed themselves with it, consecrated buildings, kneaded bread on it. Children were washed with water from a new well so that they would not cry.
The well requires a serious approach. In the village, the “well” traditions are still observed: do not arrange gatherings and picnics near the well, do not smoke or swear near it, do not give water from your well to ill-wishers and strangers, treat the well with respect.
Pumps for summer cottages - how to choose the right one, what they generally are
Of course, the type of pump for water supply to a country house and plot will depend on the type of water source and its parameters in the form of the number of points that consume water and such characteristics as diameter, total water volume, and, of course, depth. The concentration level of suspended matter in water is also a very important characteristic.
You will actually have to choose based on the above of three types - a borehole pump, a pump for a well or an automatic water supply station.
The simplest and cheapest solution is submersible well pump(of course, if you chose a well of one of the types considered above for the water supply of the dacha).
Such a pump can easily provide a small country house with precious moisture, and of course watering.
Its design is simple: stainless steel body, motor, start relay, centrifugal pump.
It does not require installation as such - tie it to a stronger string and lower it into the well, not reaching the bottom 1 meter.
A submersible well pump can pump out up to 6 cubic meters per hour from a depth of up to 10 meters (we don’t even honor manufacturers’ assurances about 30 meters or more, they make the sellers in stores angry, because pumps are often returned back with scandals, they simply don’t pull such depths ).
Some brands produce submersible pumps with a base - they can be placed on the clean bottom of the tank.
Also, one of the advantages of submersible pumps is the fact that they are practically insensitive to water quality, they are equipped with a filter at the inlet. These words are supported by the fact that for many years the “well diggers” carry the same pump with them to pump out the first muddy water from the customer’s well, and only after that I connect the master’s pump when the water is already clean.
The cooling of submersible pumps is natural, due to the pumping of cold transported water through itself.
This type of pump is quiet, does not require maintenance (it works according to the principle: it is broken - it is cheaper to buy a new one).
Of the minuses, relatively (compared to borehole pumps) large dimensions. The consumption of electricity, and the lack of automation - will pump until you turn it off.
Downhole pumps (deep pumps)
Actually, everything is said in the name - they are needed for lifting and supplying water from wells, from great depths up to 40 meters inclusive.
Choose exactly knowing the depth of the well, and having calculated at least approximately your need for water. A well passport with a characteristic of the number of liters of water per hour will help you and, of course, advice from the one who drilled the well for you (if you did not drill it yourself).
They don’t buy a borehole pump with a margin - if water is pumped out earlier, it will idle, and this is an unacceptable load for borehole pumps and a moment that largely determines their service life.
The dimensions are very compact, allowing them to extract water even from very narrow wells. The water pressure is excellent - on the spot, you can water a third of our standard plots of 6 acres.
Additionally.
The most ideal option for water supply using pumps is, of course, automatic, arranged using a pump, a hydraulic accumulator, a pressure gauge, a pressure switch, shut-off and check valves. With this design, there is enough water for everything and for a washing machine and a dishwasher and for washing a car and for watering and showering.
home station
A pumping station operating in automatic mode is the best solution for autonomous water supply to summer cottages. It replaces the submersible pump and supplies water from 10 meter water storage tanks. It has the already mentioned accumulator, relays, mesh filters, etc.
The core of the system is a pump, it can be either centrifugal or vortex.
Vortex will provide smaller dimensions than centrifugal, it costs less and gives more pressure. The main disadvantage of the vortex pump is that it does not tolerate even the slightest water pollution and quickly fails.
ANS with a centrifugal pump is “indifferent” to water quality - it pumps what it has, it can be equipped with an ejector, which further enhances its power and will allow pumping water from 20-25, and in some cases, more than meters.
Cons: Very noisy.
There are also many other options for a separate, autonomous water supply, given the annual improvement of manufacturers in this area. Every year, water filtration methods are improved, the productivity of pumps is growing, and, therefore, it is always possible to increase the depth of a future well to improve the amount of water.
How to calculate the amount of water you need.
Daily and weekly water costs can be determined by knowing the flow rate at all water intake points. The water consumption norms provided for various plumbing devices and appliances will help you with this.
On a note:
Watering the lawn will require at least three cubic meters of water per square meter. At the same time, water consumption can either increase or decrease due to the method of irrigation - fan, drip, automatic irrigation by time of day.
Irrigation of lawns and flower beds requires 3-6 cubic meters of water per square meter, while the consumption also depends on the method of irrigation and the intensity of irrigation.
Calculation of water pressure - formula
To calculate the pump head you need, use the formula below:
"Htr \u003d Hgeo + S + Hsvob".
"Ngeo"- the height of the pipeline entering the building relative to the water level in the well (which must be indicated in the well certificate).
S- the sum of all pressure losses, taking into account friction in the water supply and other parts of the system.
Nsvob- the pressure that is needed at the point of entry into the house, taking into account the provision at the highest and most remote point of the water consumption of the pressure value (0.5 atmospheres).
Interesting fact:
Water-lifting devices, consisting of a wheel and trays and jugs attached to it, were known in antiquity to many peoples. The wheel rotated by the force of the river, the water scooped up by jugs moved by gravity along the trays over long distances. Later, the simplest pumps appeared, made of wood with a movable piston for drawing water from a well. In the first century BC, a Greek scientist constructively described the first fire extinguishing pump.
- Be sure to compare those parameters and water quality characteristics with those recommended by the pump manufacturer in the REU.
- Make sure that the pump is equipped with protection against power surges, "idling", tight, resistant to water hammer.
- Be sure to read the instructions for installing the pump and its installation - even if you don’t install it yourself, you will control the situation when the installers start installing it.
- A guarantee for a pump and a service is far from empty for them and must be - pumps work under heavy load and their failure is not such a rarity.
- I don’t advise you to take pumps with a plastic case; in general, when buying, pay close attention to the quality of the case.
The principle of operation of the drainage pump
An impeller with blades is fixed on the drive shaft of the drainage pump. Through the suction grate at the bottom of the pump, the pumped water enters the rotating vane channel. Here, entrained by the impeller into rotation, it acquires a significant speed and radial (from the center to the periphery) pressure. At the outlet of the impeller, the liquid leaves the pump in an intense flow through the nozzle.
float switch
This is a device that is used as a pumped water level sensor to control the operation of the pump. The use of a float switch prevents the pump from running without water (dry-running protection), thereby protecting it from failure.
An automatic switch is built into the float, which (when the pumped water drops below a certain level and the float lowers) opens the contacts in the power supply circuit of the pump motor, thereby interrupting its operation. When the water level rises, the float rises and when a certain level is reached, the engine power circuit closes and the pump resumes operation.
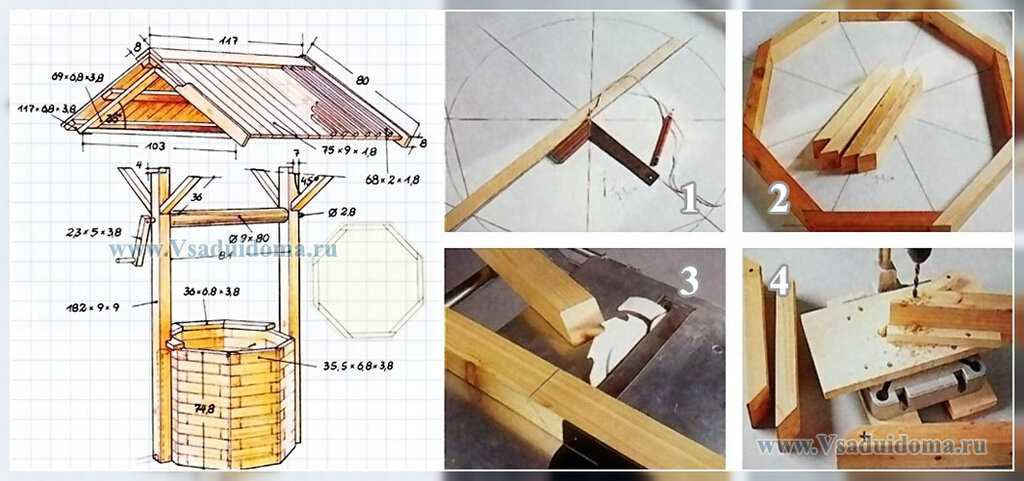
We decorate the well - do-it-yourself decorative wooden head
Mine wells assembled from gray concrete rings naturally will not improve the appearance of a summer cottage. Therefore, somehow you will have to ennoble this business with your own hands. Hiring a carpenter or joiner because of such a trifle is reluctant - after all, the process is creative, and you want to fulfill the idea on your own.
And in the case of a decorative well (these can often be seen in rural-style or “country-style” cottages), it is even simpler - earthworks will not be required at all, since the well is installed directly on the ground. Rack anchors driven into the ground will prevent the structure from tipping over in strong winds. The role of a well reservoir will be played by an ordinary barrel for irrigation. Water is supplied to the container using a hose laid in one of the racks, and a pump. A bucket on a chain plays a decorative role in the design. There is no need to scoop water from above, bending over under the weight of the bucket: an additionally installed drain valve at the bottom of the well solves the problem. It is enough to substitute the container and turn the handle!
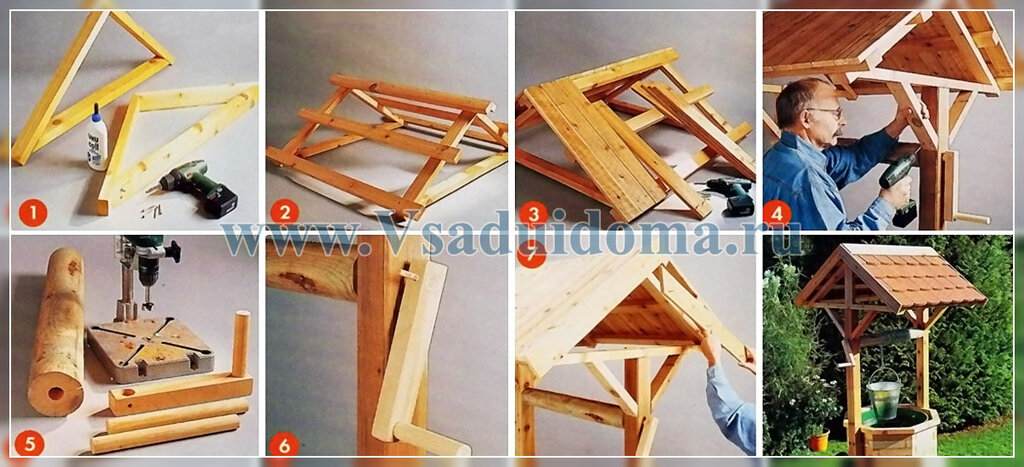
Stage one: preparation of wooden blanks
1. Draw a horizontal projection of an octagonal well on a piece of drawing paper on a scale of 1:1.
2. From a bar with a section of 38 x 68 mm, cut pieces 35.5 cm long on the outside. Cut the ends at a 45° angle.
3. Lay out the trial parts directly on the plan. If the dimensions are correct, you can start cutting. A total of 88 parts are needed.
4. For the threaded rods on which the log parts are assembled, drill the segments through from one end.
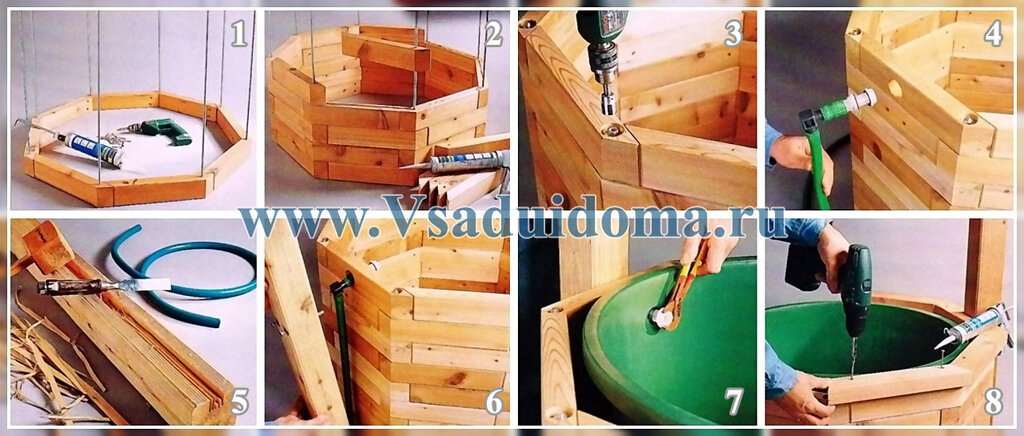
Stage 2: Assembly of the well
1. Put the bars of the first row on the rods equipped with nuts and washers. Lubricate the joints (ends) with glue and additionally strengthen with self-tapping screws.
2. Lay row after row, in each subsequent row shifting the bars relative to the rod. Also use an additional glue joint between rows.
3. After laying the last row, saw off the threaded rods flush and file them. Washers and nuts "drown", after countersinking the holes.
4. In one of the segments of the upper row, pre-drill a hole d = 26 mm to install a hose that supplies water to the barrel.
5. One of the racks will hide the water supply. Make a groove in it for the hose: make two parallel cuts with a circular saw, then remove the wood with a chisel.
6. Attach the posts to the sump body with four mounting bolts (8 x 140 mm). Drill holes d = 8.5 mm in advance, insert the nuts inside.
7. After fixing the stands, install the water supply. Since the water pressure will be low, simple plastic hose fittings will suffice.
8. The parapet of the well is formed by bars laid horizontally and beveled at the ends by 22.5 °. In two segments, first make cuttings for the racks.
9. The rods alternately pass through one of the elements of every second row. Details are strung in a checkerboard pattern.
Stage 3: Installation of the roof
1. The supporting structure of the roof consists of two triangular "pediments" screwed together from bars. For added strength, add an adhesive joint.
2. Connect the gables with six bars - they will serve as a crate for the roof. Compose the skate from two angled and glued bars.
3. Lay a roof over the crate - a simple or tongue-and-groove board. It will be possible to lay the existing roofing material on top.
4. In order for the roof structure to rest securely on the racks, stiffen the corners on both sides with braces. To do this, chamfer the bars by 45° and screw them on.
5. Make the axis of the gate from a thin log d = 9 cm. For the main necks, use round rods d = 2.8 cm. For the crank, take a bar 23 cm long and drill it (hole diameter 2.8 cm).
6. Use waterproof glue to install the main journals into the drilled holes. From the side of the handle, release the neck behind the rack by about 5 cm. Put the crank on this outlet, after lubricating it with glue. When the glue dries, additionally strengthen the junction with a dowel.
7. Strengthen the gable boards by sawing them off with a bevel from the side of the ridge. A small protrusion of the boards towards the roof is designed to hide the edge of the roofing material.
8. If the well is “fake” and only masks the water column, then the design of the gate is similar to the real one, but plays a purely decorative role: the root necks passed through the racks are glued tightly into them and cannot rotate.
Do-it-yourself summer water supply in the country
The water supply in the dacha, where they live in the summer, and the rest of the time they come for the weekend (or less often), differs from the water supply of the cottage. Firstly, in the house where they stay constantly and all year round, there is always a positive temperature, which cannot be said about summer cottages. Secondly, when installing a water pipe outside the city, it is necessary to provide for the supply of water not only to the house, but also to the bathhouse, summer kitchen, and greenhouse. Thirdly, summer water supply is used mainly in summer, and is not used in winter. Depending on your needs and the frequency of visiting the cottage, a stationary or collapsible water supply system is selected. The second option is as simple as possible in the device and consists of simple hoses lying directly on the ground. In the autumn they are put away for storage in a barn.
Choosing pipes
For a stationary summer water supply scheme, pipes are laid in the ground, and only water taps are brought to the surface. The choice of pipes comes between two types - polyethylene (HDPE) and polypropylene (PP). HDPE pipes are cheaper, but it is unlikely that it will be possible to save much, since the components for them will be expensive. Polypropylene pipes are more expensive, but they have a lower cost of related materials. True, for the installation of polypropylene pipes you will need a special soldering iron.
How to avoid freezing plumbing
Both polyethylene and polypropylene pipes are resistant to freezing. For the possible winter use of the water supply, they are placed in the ground to a depth of 1.5 meters (below the freezing level of the soil in the middle lane). If you plan to use water only in summer, one meter of depth is enough. It makes sense to dig a trench only to a residential building - pipes can be laid directly on the surface in the garden and vegetable garden.
The insulation system will save the water supply during winter use, if you do not want to deepen it. Special thermal insulation of pipes and a polyethylene corrugated casing will allow laying pipes to a depth of up to 30 cm. Another option is laying a heating cable, which will make it possible to place pipes directly on the surface.
The optimal diameter of the pipes: 15 mm is usually enough in the house, pipes with an inner diameter of 20 mm or 25 mm are used for plumbing, the inlet pipe must be at least 32 mm.
Calculation
Before buying all the necessary parts, study the place where the water will come from (the diameter of the valve, if it is already there, must match the diameter of the pipes). Next, determine where the outlets will be - for example, at the greenhouse, near the platform for the car, etc. Then draw a diagram on the site plan - how you will run the pipes from the water exit point. The plan will allow you to more accurately calculate the number of parts needed and help you communicate with the seller.
Drainage Tips
- When connecting a water heater, provide a tee and a tap for discharging used water with a hose nozzle
- To drain more than 50 liters from a water heater, provide a branch that will not go into a septic tank or loss, otherwise you will have to dump water into the street, which is not only not aesthetically pleasing, but also inconvenient.
- Traditional ceramic or rubber sealed faucets are less sensitive to residual water freezing.
On a note:
The main disadvantage of a permanent water supply, which is used only in summer, is the correct slope of all pipes of the system, namely, all of them must go with a slope to the tie-in connection.
As a rule, the tie-in is the lowest point of the water supply, usually a valve is made here, which is designed to drain water for the winter or in case of repair of the water supply.
Summer water supply does not have to be autonomous (from a well or well) - it can also be connected to the main water supply (if any). In this case, there is no need to drill a well or dig a well, save electricity, but there is a monthly fee for the use of water.
Conservation of plumbing for the winter
If the dacha is not heated in winter, then you will have to drain the water from the system every time before a long departure, absence.
Draining will be more convenient if, in front of the check valve of the pipe through which water enters the house, install wiring, a tee and a tap for emergency draining.
The same tap will be needed at the lowest point of each pipe branch in the house. Remember to remove water from washing machines, toilet bowls, etc. devices. In these cases, simply draining the water is not enough - the units will need to be turned over or blown through with a compressor. The water from the toilet should be pumped out (or filled with salt) so that in winter it does not freeze and the toilet does not burst. The sequence of actions is as follows: first, the pipeline supplying it is freed from water, then the liquid is removed from the water heater, and then the washing machine and plumbing are drained. After draining, the residual water in the diaphragm expansion tank must not damage it when it freezes.
Polypropylene plumbing
First, all threaded connections are assembled, then they are attached to the pipe. The most difficult thing is to assemble the threaded connections so that water does not leak from them. In a threaded connection, one part has an external thread, the other has an internal thread. A fum tape is carefully wound onto the external thread (6-7 layers are enough, but if the thread is completely bad, then more is possible).
Then they screw and tighten the parts, pressing them tightly against each other, making sure not to skew. After that, you can gently tighten the details with a key, without fanaticism, of course.
To fix the pipe in the coupling, it is evenly cut with a hacksaw.
After loosening the clamping nut as much as possible, insert the pipe tightly. The pipe, which has gone into the coupling all the way, continues to be pushed further - another two centimeters. When the pipe finally stops, tighten the clamping nut.
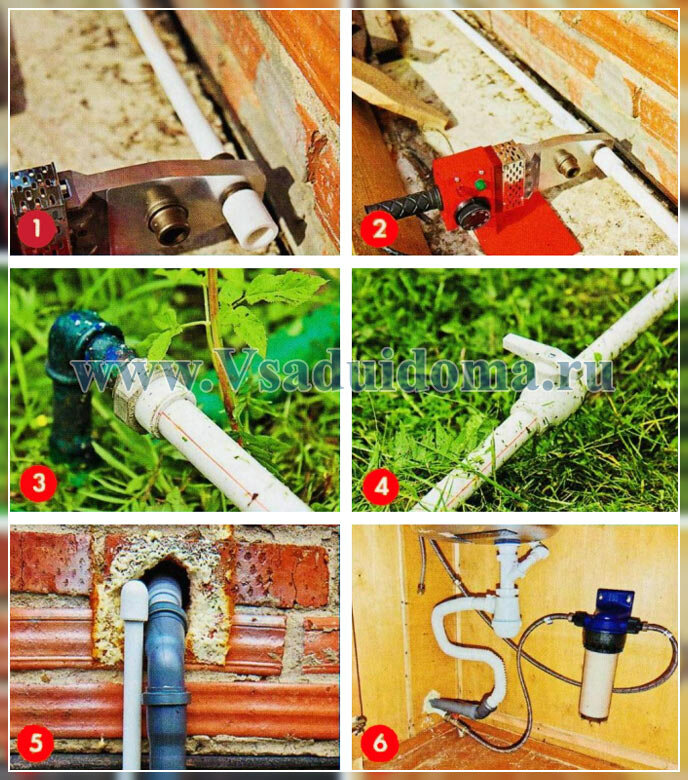
Assembling a summer plumbing system in the country with your own hands - a description of the photo
1. We measure and cut the pipes, clean their ends from burrs, take a welding machine.
2. Welding of polypropylene pipes. The technology is simple: the element of the apparatus is heated to the melting temperature of the pipe, a sleeve is put on one sleeve, a pipe is inserted into the other. The pipe and coupling are melted, they are removed from the apparatus and inserted into each other. Frozen, they form a single whole.
3. Install a tee - branching water into the house and the garden. Let's make a conclusion to the crane. If in the future such a water supply is planned to be finalized and, for example, increased, put a plug.
4. We put the coupling nut on the tape, we screw a plastic pipe with a tap onto it. It will be very convenient with its help to preserve the water supply for the winter.
5. Entering water into the house. The water inlet hole was made more than 2 years ago when the kitchen and sink were installed. The drain then went into the pit.
6. Ready plumbing in the house with a flow filter. In total, at least two filters are needed - a standard mesh filter and a flow filter with one container.
Water analysis, purification and filtration
Sanitary services monitor the quality of drinking water in the city. Outside the city, all responsibility lies with the owners of summer cottages. How do you know if the water is suitable for drinking or is full of harmful substances that adversely affect health? Laboratory analysis of water will give a detailed answer, what exactly we will drink under the guise of a clear liquid. Water sampling for research will be done either by a specialist or by you.
The most polluting water is runoff from poorly insulated pit latrines. From there we get bacteria and viruses, worm eggs. Domestic sewage will give water surface-active substances (surfactants), salts, complex aromatic hydrocarbons, phosphates, nitrates and nitrites. Mineral and organic fertilizers will add calcium, carbonates, sulfates, chlorides. And after washing your own car on the site, you will get oil products, particles of lead, cadmium and other heavy metals (they are abundant in the soil along highways). And if we can wash the car at a car wash, then what about the water after washing clothes and other inevitable drains? The way out is to install an affordable filtration system and reliable treatment facilities. By the way, when ordering filtration or sewage installations, the company you contact will most likely offer you to do a water analysis for free.
Where to do?
Laboratory research with quantitative indicators of harmful substances is carried out at the sanitary and epidemiological station, in scientific organizations or specialized laboratories. A protocol with the results and a conclusion on the suitability of water will be given to you in 1-2 days. It is better to do a complete analysis during the initial examination of the source, and then conduct an annual preventive examination.
What are water tests?
- basic (general assessment of the state of water according to 7-16 main indicators)
- complete (about 40 indicators)
- specific (for individual indicators at the request of the customer)
How to send water for analysis
1. Sterile container for bacteriological analysis (purchased at a pharmacy or sterilized by steam ourselves).
2. We take a sample “under the neck”, so that water does not come into contact with the strongest natural oxidizing agent - oxygen.
3. For chemical analysis, water can be brought in a clean plastic bottle from mineral water, rinsed with a pre-test sample.
4. Before drawing water from the well, pump the system for at least 10 minutes.
Plot column
Inside the light construction of a garden, decorative water column, between two wooden racks, a galvanized pipe and a threaded fitting are hidden, only the drain valve on the front side remains visible. In fact, the column is a holder for a pipe, water to which is supplied in any way possible: from a well or from a central water supply. The panel on the rear side is easily unscrewed and removed, so the supply "pipeline" is always available for repair.
The only difficulty is that the construction will require a concrete foundation with a depth of about 80 cm! The column itself is assembled elementarily. Two posts with a section of 7 x 7 cm are attached to the foundation with steel anchors at a distance of 7 cm from each other (special grooves in the anchors - the bends of the holders on both sides - provide a sufficient distance between the soil and the tree). Communications are laid between the racks and closed on both sides with wooden panels. It remains to cover the "column" with a lid that protects from precipitation - and you're done, such a Russian!
materials
The material for the wooden column was 7 x 7 cm wooden blocks and a 22 cm wide x 20 mm thick pressure impregnated pine panel. In principle, a protective coating is not required for such a material, but you need to be prepared for the fact that after a few years the wood will turn gray.