
Remote access to a computer via a network. Remote access to a computer via the Internet. Remote access to a computer with a static IP address
Technical support for users of your own software product, administration and control of the corporate network - all this requires remote control of the client's computer. And the field of software products for remote access is not empty: the tools are provided both by the Windows 7 operating system itself and by numerous third-party programs. Built-in tools are good for their accessibility, third-party ones - for an intuitively simple interface, "sharpened" for ordinary users. Having analyzed the principles of operation, the pros and cons of each method, you will be fully equipped, and the network and users will be under control.
Windows 7 Remote Desktop Setup
Remote Desktop is available in Windows 7 Premium Edition and above. You will need it if you need to work with it on computers running Windows 7 Home Edition (the cheapest), provide support for multiple remote desktops - to connect to multiple computers at the same time - or change the port address used by the RDP service. This will require non-trivial settings that can be made to the system using the registry editor or third-party programs. But it's better to spend a little of your time than a large amount of money to buy a new operating system.
Remote desktop port
The RDP service, the functions of which ensure the operability of the remote desktop, uses port number 3389 as a standard. The probability of hacker attacks on this port is very high, so you can change the port number to increase the level of network security. Since there are no settings in the "Control Panel" for this, you will have to use the system registry editor.
- From the command line, launch the registry editor with system administrator rights.
Launching the Registry Editor to Change the RDP Port Address
- In the editor window, navigate to HKEY_LOCAL_MACHINE\System\CurrentControlSet\Control\TerminalServer\WinStations\RDP-Tcp\PortNumber. The list of registry branch variables will be displayed on the right side of the window.
The necessary variable is hidden deep in the bowels of the system registry
- From the context menu, select "Edit" and enter a new port address, after making sure that the value entry mode is decimal.
Switch the system to decimal and enter a new value for the port address
- Now, in order to connect to a computer, you will need to enter not its name on the network, but an address with a port number, for example, 175.243.11.12:3421.
Changing the port address from the default 3389 to a custom port will prevent the Remote Assistance service from working on computers running Windows XP. Take this into account if there are any on your network.
Remote Desktop in Windows 7 Home Premium with support for multiple remote desktops
In order to encourage users to spend more money, Microsoft has seriously limited the capabilities of the remote desktop service depending on the OS version. For example, in “Home Extended” and below, the ability to connect remotely is not available at all, and in any other, the number of sessions is limited to one, that is, you cannot connect remotely to two or more computers at the same time. The manufacturer believes that for this you should purchase a server version of the system of a special edition (Terminal Edition).
Fortunately, caring enthusiasts have worked to resolve this difficult problem. The result of their efforts is the RDP Wrapper Library software package. Once installed, it intervenes as an intermediary between the Remote Desktop Service (RDP) and the Service Manager, after which it tricks them by emulating the presence of Windows Server Terminal Edition on the network and enabling the RDP service on computers running Windows 7 Home.
The program is available for download from the author's page and is completely free. After downloading and running the installer, all settings are made automatically, including making changes to the firewall rules.
RDP Wrapper Library - installation is automatic
The included RDPConf.exe utility will allow you to enable or disable remote access on the fly, change the number of simultaneous access sessions and the RDP service access port number.
Using Rdpwrapper, you can configure remote access settings
How to allow or deny remote access
All options for allowing or denying remote access to a computer are located in the "Computer Properties" section of the control panel. You can enable or disable remote control in just a few steps. Don't forget that you must be logged in with an account with administrator rights to make these changes.
- Use the Win+Pause key combination to open the system properties window.
Win + Pause keys will help to enable "System Properties"
- In the left column of additional actions, click on the link "Remote access settings".
- The following control settings are available in the dialog box that opens:

- It should be noted that for remote control to be possible, the user account opening such a session must have administrator rights. To enable remote control of a regular user, you should add his name to the list of permissions, which can be accessed using the "Select Users" button.
If the user to whom you want to grant remote access does not have administrator rights, you can add it in this dialog box
Video: how to allow remote access to a computer
Remote Desktop Connection
Connecting to a remote desktop is very simple. Naturally, before that, you need to enable all the necessary permissions on the client machine and create a list of users on it who will be allowed remote control.
- Call the standard command line dialog and run the mstsc.exe utility with it.
Calling the Remote Desktop Client Program
- On the General tab, enter the name of the computer to connect to in the upper column of the dialog box, and the username in the lower column (if necessary, a name that differs from the one under which you logged in). Remember that the user account must have administrator rights.
Entering the computer name on the network for remote control
- In the "Interaction" tab, select the planned connection speed based on the capabilities of your network. If you find it difficult to choose the settings, leave automatic. The system will test the channel speed and select the optimal values.
Choose the channel speed based on the capabilities of your network
- If everything is done correctly, and remote access is allowed on the client machine, you will see a window for entering a username and password. Enter the username and password of the client machine.
- After clicking the "Connect" button, a window with the desktop of the remote PC will appear. It can be expanded to full screen and create a complete illusion of working on a client machine.
Avoid working in high resolution video modes: this will create a large load on the network, and the remote PC interface will be jerky. The ideal option is a resolution of 1280x1024 pixels and a color depth of 16 bits.
What to do if Remote Desktop is not working
Problems connecting to a remote computer can be caused by many reasons. Among the most common are the following:
- on the client machine, the permissions for access to the remote desktop and remote assistant are not enabled in the settings;
Make sure that the settings allow remote access to the PC
- the account with which you are trying to remote access does not have administrator rights;
Make sure your account has admin rights
- your computer and the client computer are not in the same workgroup or domain on the local network;
Slave and master must be members of the same workgroup
- the router of the local network used by both computers blocks port 3389, through which Windows 7 remote control services communicate;
Turning on the firewall in the router without additional configuration blocks most ports
- outgoing requests from Remote Desktop Services are blocked by the antivirus package.
Remote Desktop Service may be blacklisted by an antivirus package
remoteapp is disabled
A message about disabling remote access is often waiting for the user when trying to connect to it, and a dialog box also appears, which can confuse an inexperienced user.
Licensing service error will not allow you to start a remote desktop session
Meanwhile, everything is very simple: the rights of the user who tries to "raise" the remote desktop session are not enough to change the registry key responsible for licensing. The error is corrected in two stages.

Why does remote desktop slow down?
The uninterrupted operation of a remote desktop session requires a high-speed channel, the lion's share of which is eaten by the transfer of the remote desktop image itself. Depending on the working resolution on the client machine, the traffic can be so dense that it will “put down” a mid-office 100-megabit local network. But in the network, in addition to two communicating PCs, there are also clients. To prevent network collapse, the remote access program starts to reduce the number of transmitted frames (frames) per second.
If at 60 frames per second you see a smooth, smooth picture, then at 30 frames per second the interface will be displayed with noticeable jerks. Lowering the screen refresh rate further will make the job unbearable: you won't even be able to accurately position the mouse cursor on interface elements. To prevent this from happening, you should optimize both the network connections of the slave and master computers, and the screen settings of the client computer.

Remote access to Windows 7 components
In addition to managing the remote desktop by emulating the operation of the keyboard and mouse of a client computer, Windows 7 remote access tools also allow you to remotely launch programs and system commands from the command line interface, manage the system registry and firewall (firewall), as well as restart or turn off the slave PC . It requires less network and system resources than Remote Desktop Control and can be done invisibly to the user working on the computer.
Remote command line
For the needs of system administrators, Microsoft has developed a special service utility. Interacting with the remote access services of the operating system, it allows you to access the command line interface of any computer on the local network, run programs on it, and even remotely install programs before they start. The utility is called PsExec and is available for free download from the official Microsoft website as part of the PSTools package.
Download the utility from the server, run the installer executable file on the computer that will be used for management, and, having agreed with the text of the license agreement, carry out the installation.
Install the PSExec utility
Now you can call the utility from the command line and use the full range of its wide features.
Let's take a closer look at the syntax of the command and its additional launch options: psexec [\\computer[,computer2[,…] | @file][-u user [-p password]][-n s][-l][-s|-e][-x][-i [session]][-c [-f|-v]] [-w directory][-d][-<приоритет>][-a n,n,… ] program [arguments].
Table: psexec command launch options
| Parameter | Description |
| a computer | Tells PsExec to run the application on the specified computer or computers. No computer name specified - PsExec will run the application on the local system. If the computer name is replaced by an asterisk (\\*), then PsExec will run the application on all computers in the current domain. |
| @file | Tells PsExec to run the application on all computers listed in the specified text file. |
| -a | The processors on which the application can be run are separated by commas, and the processors are numbered starting from 1. For example, to run the application on processors 2 and 4, enter "-a 2,4" |
| -c | The specified program is copied to the remote system for execution. If this parameter is not set, then the application must be located in the system folder of the remote system. |
| -d | Specifies not to wait for the application to complete. This setting should only be used when running non-interactive applications. |
| -e | The specified account profile is not loaded. |
| -f | The specified program is copied to the remote system, even if the file already exists on the remote system. |
| -i | The program being run gets access to the desktop of the specified session on the remote system. If session is not set, then the process runs in a console session. |
| -l | When the process starts, the user is granted limited rights (the rights of the Administrators group are revoked and the user is granted only the rights assigned to the Users group). On Windows Vista, the process starts with low trustworthiness. |
| -n | Allows you to set the connection delay to remote computers (in seconds). |
| -p | Allows you to specify an optional password for the username. If this parameter is omitted, you will be prompted to enter a password, and the password will not be displayed on the screen. |
| -s | The remote process runs from the system account. |
| -u | Allows you to specify an optional username for logging into the remote system. |
| -v | The specified file is copied to the remote system instead of the existing one only if its version number is higher or newer. |
| -w | Allows you to specify the working directory for the process (the path inside the remote system). |
| -x | Displays the user interface on the Winlogon desktop (local system only). |
| -priority (priority) | Allows you to set different priorities for the process:
|
| program | The name of the program to run. |
| arguments | Arguments to pass (note that file paths must be specified as local paths on the target system). |
Examples of the PSEXEC utility
The procedure for working with the PsExec utility is as follows:
- Launch another computer's command prompt with psexec \\<сетевое имя компьютера>cmd.exe.
- Open any program on the remote computer. If the program does not exist on the slave PC, it will be copied from the admin machine. To do this, type psexec \\<сетевое имя компьютера>-c test.exe, where test.exe is the program to be executed remotely.
- If the program you want to remotely execute is not in the system folder, specify its full path when running the psexec command \\<сетевое имя компьютера>-c c:\program files\external_test.exe
Video: PSTools - a set of system administrator console utilities
Remote registry
In order to be able to remotely edit the registry, you must first activate the appropriate services on the client computer. This is easy to do if the account has administrator rights. To do this, launch the Service Manager snap-in from a command prompt window and select the Remote Registry service from the list in the main window. Press the "Start" button on the top control panel.
The Remote Registry service must be running both on the client PCs and on the administrator's PC.
Now you can connect to the registry of a computer on your local network remotely.

The registry branch of the remote PC will be displayed in the registry editor window and you can edit it just as easily as your local registry.
Remote firewall management
Unfortunately, there is no convenient graphical tool for remote control of the firewall. Therefore, all manipulations will have to be performed using the command line. First, you need to connect to the remote PC using the Telnet service. If the Telnet client is not installed, it must be added via Add/Remove Windows Components.

Now you need to establish a communication session with a remote computer via the telnet protocol.

Once a session has been established, you can remotely control the firewall of a remote computer using the netsh command. The following commands will be available to you:
query firewall rules. You can find out the Windows Firewall configuration on a remote PC using the netsh advfirewall firewall show rule name=all command;
enable or disable the firewall with the commands "netsh advfirewall set allprofiles state on" and "netsh advfirewall set allprofiles state off";
return to default settings with the netsh advfirewall reset command;
opening a port is perhaps the most common task that will need to be performed. For example, you can open port 2117 for the torrent client to work like this: netsh advfirewall firewall add rule name="Utorrent rule" dir=in action=allow protocol=TCP localport=1433;
allow incoming and outgoing requests to an arbitrary program using netsh advfirewall firewall add rule name="Allow Miner" dir=in action=allow program="C:\Bitcoin\miner.exe";
enable remote administration using the Windows console: netsh advfirewall firewall set rule group= "remote administration" new enable=yes.
After completing the necessary settings, do not forget to close the Telnet session with the quit command.
Remote reboot
The standard OS shutdown command allows you to turn off or restart any computer on the local network if it has permissions for remote assistance and remote desktop. From a command prompt window, type shutdown / /m \\computername /c "comment" and press Enter.
Table: shutdown command options
| /s | End the session of the remote PC. |
| \\computername | The name or network address of the remote PC. |
Remote connections have become widespread relatively recently. This is due to the development of local networks and the emergence of Internet access in large and medium-sized settlements. About 10 years ago, one could not even dream of connecting to a computer located several tens or hundreds of kilometers away.
But, nevertheless, the idea of connecting to a computer at a distance was tested in the process of working in local networks. And one of the reasons for the development of this feature was human laziness (or convenience). I'll give you an example. A certain system administrator has 30 computers in the local network, which are distributed over office rooms of a fairly large area or on different floors. In the process of work, users regularly have questions about the operation of programs, equipment and information retrieval. The network administrator has to leave his workplace every 10-15 minutes and help users, even if the problem is minor, because even with a phone, it is sometimes not possible to correctly identify the problem and recommend a solution. But if there is a configured remote connection to users' computers on the local network, the system administrator can, without getting up from his seat, solve the problem fully, as he will see and manage the user's computer on his own.
In a situation where computer users are located in different parts of the city, in addition to convenience, the ability to remotely connect to computers will bring significant savings to the organization on transportation costs and free the driver for other needs of the company.
Connecting to a computer on a local network
Consider the following case. There are several computers on the local network, each of which has its own IP address and name. ()
The task is as follows: connect from computer 192.168.1.2 (it) to computer 192.168.1.4 (buh3).
Without using the Internet, this can be done using a remote desktop connection or through the RAdmin program, which is very popular despite the paid license.
Remote Desktop Connection
First of all, on the computer to which you will connect (in the example “buh3” with an IP address of 192.168.1.4), you need to open the ability to connect to the desktop.
If the computer to which you want to connect is running Windows 7, or one of the Windows Server 2003 or 2008 server platforms, you must:
Right-click on the “Computer” icon on the desktop and select “Properties” from the menu that appears.
In general, set the radio button to be able to connect with any version of Remote Desktop.
Click the “OK” button in the system properties window.

If Windows XP is installed on the connecting computer, then the procedure for opening access to the desktop is as follows:
Right-click on the "My Computer" icon on the desktop and select "Properties".
Click the "Remote Sessions" tab.
Check the "Allow remote access to this computer" checkbox and click the "OK" button.

Note: if there is no “My Computer” or “Computer” icon on the desktop, then look for it through the “Start” button (lower left corner of the Windows desktop).

After the remote computer is configured, go to the computer from which you will connect. You need to run Remote Desktop Connection on it.
For Windows 7, follow these steps:
Click the "Start" button in the lower left corner of the Windows desktop.
Open the "Standard" group.
Launch the "Remote Desktop Connection" shortcut.
In the "Computer" field, enter the IP address or the name of the computer to which the connection will be made.
Click on the “Connect” button. When an authorization request appears, enter the username and password of the user on the connected computer or a domain user (if a domain is organized on your network).

Starting a Remote Desktop Connection in Windows XP is slightly different from Windows 7.
Press the start button.
Open "All Programs" (or "Programs").
Expand the "Standard" group and launch "Remote Desktop Connection".
As for Windows 7, enter the IP address or name of the computer to which you will connect and click on the connect button. When connecting, you must enter the username and password of the user available on the computer or in the domain.

If, when you try to connect, you receive a warning about the absence of a certificate on the connected computer, continue the connection by answering the question in the affirmative.
After establishing a connection to the remote desktop, you will be able to control the computer from a distance. In this case, the user sitting directly at the remote computer is blocked from access and control is intercepted. He doesn't see what you are doing. To regain control, the user must unlock the system by pressing the Ctrl+Alt+Delete key combination and entering their Windows username and password. Another remote user who connects to the computer later can also take control.
The remote desktop connection-based management method is not very helpful for you because your interaction with the user does not take place online. But such a connection is ideal for working at a remote computer on which users do not work. These can be servers, or your own workplace located in another room.
Connecting with RAdmin
The RAdmin program consists of two parts: Server (server) and Viewer (viewer).
The Server component must be installed on the computer to which you will connect. If you have a lot of computers in the local network, which periodically need to establish a connection, then this component must be installed on each computer. After installation, the RAdmin server icon appears in the system tray (lower right corner of the desktop). Through it, access to the settings of the component is provided, where you need to set a name and password for the connection. The figure below shows the sequence of creating a user, password and assigning rights for the RAdmin server part.

The Viewer component is installed on the computer from which the connection is made. This is usually the system administrator's computer. After launching the Viewer component, create a new connection, specify the address of the computer to which you are connecting, and enter the name and password specified on the side of the Server component.

Connection via RAdmin makes it possible to work on a remote computer in full interactive mode, i.e. everything you do is displayed on the screen of the connected computer online. In addition, you can send text and voice messages to a remote computer, as well as transfer files.
Connecting to a remote computer via the Internet
The process of connecting to a remote computer via the Internet is carried out in the same way as for a local network, if the connected computer has a dedicated external (or “white”) IP address. But in modern networks this is extremely rare, since the connection via the Internet is not to a single computer, but to another local network, but already in it in a specific computer. The entry point in a remote network is a router or gateway, through which you will enter a remote local network and be able to access local computers.

All computers on a remote local network have internal IP addresses and do not have dedicated external ones. Only the router has a dedicated external IP address. You should connect to it. But in order to connect to the router and go to the required computer on the local network, you need to configure port forwarding on the router (“port forwarding”).
Redirection works as follows: You connect to the router's external IP address, specifying the connection port in addition to the address. Depending on the port number, the router (according to the forwarding settings) translates your connection to a specific computer on the remote LAN. Setting up port forwarding requires some knowledge of networking and depends on the router model.
Having a working port forwarding on the router, you can connect to a remote computer that is part of a remote local network using the methods listed above: connecting to the desktop and using the RAdmin program.
Connecting with TeamViewer
The TeamViewer program allows you to quickly connect to a remote computer and does not require special knowledge of building networks and their settings. This is a convenient option for most users.
The program works with an internet connection. The computers are connected via the TeamViewer server. Where computers are physically located and how local networks are arranged does not matter.

There are several versions of TeamViewer, the most popular of which are:
TeamViewer: full version. It has the ability to both establish a connection to a remote computer, and allows you to connect a partner to yourself.
TeamViewer QuickSupport. It can only connect to your own computer. Launched by the user separately. External connection is possible only if the program is running.
teamviewer host. Only connection to your own computer, it starts at the start of the operating system. It is used in cases where it is necessary to connect to a remote computer without the approval and confirmation of the computer user.
Consider the connection process through the TeamViewer program. On the computer from which you are connecting, you must install the full version of TeamViewer. On the remote computer, you must install either the full version or the Host version, or save the TeamViewer QuickSupport startup file (this version does not require installation).

After logging in, you will be able to work on the remote computer in interactive mode. The user will be able to see everything that you do, as well as do any actions on their own.
For private personal use, TeamViewer is free and companies will need to purchase licenses to use it.
| Like |
Since our site is designed for average users, there was some disagreement within the NeError.Ru team regarding the usefulness of this article. Usually, such material is presented for more experienced users, who at least have a good knowledge of Windows.
On the other hand - where to go for a novice user who only remotely knows what RDP, TCP, UDP are? But you really want to know? Again, does the average user need this? Maybe one simple program is enough for him?
A difficult situation.
Explain in one article what remote access to a computer via the Internet is, but in such a way as not to frighten off the visitor.
We decided to experiment. Tell about the complex, as clearly as possible. We will focus on your comments.
What is this article about?
This article will tell you about two types of remote connection, briefly talk about what is ID. Talk about programs Remote Access and Remote Desktop. We will also try to set up our computer in order to access it remotely without using third-party programs. Difficult terms in the article are highlighted in brown, and provided with explanations in the form of tooltips.
The concept of remote access
Remote access to a computer via the Internet refers to operating system tools or a third-party program that allows you to get visual or file access to a computer located at a remote distance, but connected to the Internet.
How is the desired computer recognized on the Internet?
Conventionally, all remote access programs can be divided into two groups according to the type of connection:
- Using ID
- Using IP addresses and domain names
Remote access programs using ID
Of great interest are programs that use ID(unique identificator). Receiving Method ID something like this: when a remote access program is launched on the computer to which the connection is planned, it sends a request to its server through which the connection will be made.
Having received this data, the server generates for the computer unique identification number — ID. This number is assigned to the computer. It is highlighted in red in the screenshot below.
Knowing this identification number and password, you can connect to a computer from anywhere in the world with this ID.
It remains unchanged until the hardware is replaced or the OS is reinstalled.
So the use of such programs is very convenient. When changing the Internet provider, city, and even country, your computer ID Will not change.
The disadvantage of programs using ID one - they are paid or shareware. Condition - you must not use the program for commercial purposes.
An example of programs using ID— TeamViewer , Ammy Admin . But the list is not limited to these two. They are simply the most popular and always heard by users.
We will not spend much time on these programs, as their interface is simple and allows you to learn the program in 5-10 minutes. In the future, we may consider each of them.
You won't have any problems with these programs. Use on health, not abusing. If TeamViewer will connect to a large number of ID- then sooner or later, the communication session will be limited to five minutes.
Remote access programs using IP address or domain name
With this category, things are a bit more complicated. They need a static ip address or domain name. Connection via IP address, this is a classic type of connection. It does not offer as much flexibility in the location of the computer and is most commonly used in "office space".
In order to use it, you need to do the following.
Connecting a fixed IP address or domain.
You need to connect an additional service with your provider - Fixed ip address . This service is provided by many providers, including mobile ones. This service will assign an external ip-address of the format 123.123.123.123 to your home network
It is this address that will allow you to find your computer from the outside.
An alternative to a fixed ip-address can be a service DynDNS. Upon registration, you will be given an individual domain, for example:
neoshibka.dyn.com
Next, you simply install a program on your computer that, when turned on, will track your current ip-address and send it to the server DynDNS, which in turn will match your current dynamic ip address , with address yourlogin.dyn.com
Thus, wherever you are, no matter what provider you use, no matter how often your IP address changes - the address of your computer - yourlogin.dyn.com
We will not undertake to assert, but getting a fixed ip-address from a provider is somewhat easier and cheaper than using DynDNS. For example, at the time of this writing, the cost of a dedicated IP address was only 20 rubles. / month
Advertising
Opening a port on the target is a remote computer.
Even now, knowing our ip-address or assigned to us DynDNS domain, we can hardly connect to the computer - the firewall will not let us through. Most likely a port 3389 used by the program Remote Desktop which we will tame in this article will be closed. In order for everything to work as it should, we will have to open it and redirect it to the desired computer on the network.
Difficult? Not at all. Let's try to understand in practice.
Remote access to a computer over the Internet using Remote Desktop
So, first what we did was get a fixed ip address from our ISP. Remember, write it down, draw it.
Second. Let's find out intranet ip address our computer. To do this, we will follow the following path: Network and Sharing Center => Local Area Connection => Details  As you can see in the screenshot, the address of our computer within the network 192.168.1.102
Third point will be the opening of the port 3389 to the above address. To do this, go to the router. In our case, this ADSL modem TP-LINK. We will show everything by his example. There's nothing you can do about it, but you can't do without instructions if you don't know how to set up the modem yourself.
In our case, we go through Google Chrome by the address 192.168.1.1 and under the combination admin/admin. We get to the information page.
Let's go to Advanced Setup => NAT => Virtual Servers and press the button

Here you can choose ready-made services or create your own.
We will create our own and call it Udalenka, but the name can be absolutely anything. We prescribe the local address of the computer, the one that was spied on earlier. In the table, we write the port everywhere 3389 and choose protocol TCP/UDP. We do all this based on a standard Windows application. Remote Desktop. For other programs, the ports may be different. A good list of applications and the ports they use is given. (What we are learning can even be useful for games).
If, for example, you want to use Remote Desktop, and advanced RAdmin, then you will have to register a different port for it: 4899 .
Click the button

Item fourth, we will run on the computer we are going to manage − Terminal Server Service. Here it is worth clarifying something.
Using the method described below is not recommended from the point of view of license purity if you do this in the organization where you work. Not sure about Windows 10, but in Windows XP-7, the license was not violated if only one user connected to the computer.
We, on the other hand, do all this for the purpose of familiarization and in order to learn the principles of remote access to a computer via the Internet.
So here's to run on the computer Terminal Server Service. In Windows XP, this was done simply - Went to Administration — Services and Applications — Services found it and just turned it on. This allowed one user to connect to the computer. At the same time, the user who was sitting locally was disconnected.
In Windows 10, we need to do things a little differently. We need a special patch. You can download it from here. This patch will allow you to run on the system Windows 10 terminal service.
Recently, search engines Google and Yandex began to consider this file as a virus threat. In fact, the file was on the site for two years, and never a single scanner considered it to be malware. However, now the file is stored outside of NeOshibka.Ru - you download it at your own peril and risk.
Unzip the downloaded file to any location. For example on Desktop. Run as administrator file install.bat

A black command line window with the following content will report a successful result:

Fifth point we will set a password for our user, and also add it to the group.
To do this, on the icon A computer and right click to select Control.

In the window that opens, in its left part, we need to expand the list Local Users and Groups, select subitem Users.
In the list of users, you need to find yourself and right-click.

Enter your password twice, press

Now we need to add our user to the group Remote Desktop Users.
In order to do this:
Right click on the user - Properties.
In the window that opens, go to the tab Group membership and press the button <Добавить…>

Next, do everything in the same order as in the screenshot: 
As a result of the work done - Remote Desktop Users should appear in the general list of groups to which the user belongs.

We would like to draw your attention to the following. The above describes how to assign a password to your user. But it's better to create a new one and already attach it to the groups. Otherwise, you may end up losing some data. For example, we logged out wherever possible. I had to type in all the passwords again.
Let's check if we managed to get remote access to the computer via the Internet using Remote Desktop.
We go to another computer, go to Start Menu => All Programs => Accessories and run the program "Remote Desktop Connection".
Enter in the window that appears the ip-address assigned to us earlier by the provider, press the button <Подключить> .

If everything we did before, we did it right, then we will be asked almost immediately Name and Password user on remote machine. Enter them and do not forget to check the box to remember the credentials.

And the last "touch on security" will be checking the certificate of the Remote machine. Here, too, we must agree with everything. And check the box too.

That's all. If everything works as it should, you can climb in the settings of the Remote Desktop program. Here you can turn on / off the sound, change the picture quality, connect local resources to the remote machine.
The remote assistant is the most useful option of the Windows operating system. It allows two PCs to interact at a distance, in this situation the computer has two users at once - one that sits directly in front of the real computer and the second, which is in a completely different place, but on his PC he can not only watch what is happening on the display first, but also manage it. Remote Assistance is a great solution when an inexperienced user needs to quickly configure or fix something, and he does not know how to cope with this task. However, to start using Remote Assistance, it must be configured accordingly. We will go through the process of activating Remote Assistance, and also explain how how to set up remote access on the example of a PC running Windows 7.
How to activate the remote PC access option?
Activation of remote access to a PC is carried out through the "Control Panel" of Windows. We execute the following instruction:
3. Click on the link "System".

4. A new window will open in front of us, click on the link "Setting up remote access" in it.

5. Now click on the "Remote Access" tab and check the box "Allow remote assistance connections to this computer".

6. Press the "Advanced" button, the "Remote Assistance Options" window will open in front of us. If you check the box "Allow remote control of this computer", the remote assistant will be able not only to see the screen of your PC, but also to control it. Also here you can set the maximum time during which the help session will be active.

7. After installing additional settings, click "OK".
8. Done! We have activated Remote Assistance.
So, we have activated Remote Assistance, but that's not all. Now you need to "friend" the computer on which the configuration is being carried out with the computer with which you want to interact via remote access. Setting up remote access is a more complicated procedure than activating it, but if you carefully follow the instructions below step by step, everything will work out. So:
1. Click the "Start" key, click on the "Service" folder in the menu, and select the "Windows Remote Assistance" item in it.

2. A window will appear, in it we click on "Invite someone you trust to help." Pay attention to the explanation of the link - "The assistant with whom you wish to interact will be able to see the display of your PC and control it." However, if you have disabled control in the previous instruction, you will only be able to view the screen.

3. Now you can choose the type of invitation, the most universal option is "Save invitation as a file", you can save the invitation on your computer and send it out in ways, not only via mail, but also via, for example.

4. So, click on the item "Save invitation as file", specify the path to save and click "Save" - at this step the remote access window will be launched with a password to it - below you will see the line "Waiting for an incoming connection".


5. Now you need to transfer the file to the assistant in any way convenient for you, it will open as follows, send the password to the user.

6. To see your desktop, the assistant will only have to enter the password, after which you will see a confirmation window on your desktop for allowing remote access, click "Yes" and the management session will be started.

7. However, for now, your assistant can only see your desktop, and not manage it. To start management, you need to send a management request (at the top left in the Remote Assistance, click "Request management"), you, in turn, must accept it.


8. That's all, now the assistant can start managing, and you can end the session, pause it or open a dialog box at any time.
Important! If at the step "Save the invitation as a file", the PC tells you that this PC is not configured to send invitations, the problem is most likely in the firewall settings. Reconfiguring them is very simple - go to the "Control Panel", select the item "Windows Firewall".


In the "Allow programs through Windows Firewall" window, click the "Change settings" button.

And then tick the two boxes opposite the line "Remote Assistance" and click "OK".

Results
So, now you know how to set up remote access, and in an emergency, you can ask your friend who understands the hardware better than you to help deal with a difficult situation. We hope this article helps you solve your problems! Good luck!
Good day, dear readers of my blog. Did you know that while at work, you can easily access your home computer from your phone and view any information.
Today I will tell you how to remotely connect to a computer via the Internet. It will be simple, fast and safe. Scare your loved ones with phrases: “I know what you did last summer” in a Word that opened from nowhere while they work on your laptop, and get access to their mobile phone.
How to connect in Windows 7 and other OS
So, knowing the name of the computer, you can easily connect to it via the Internet. Frankly, I like this method a little less than the one that I will talk about a little later.
It's a little more difficult. Nevertheless, it is quite popular and has its own advantages.
So, go to the Windows 7 Control Panel. Click on the Start menu and find the desired category here.
In the list we find "System".


In principle, you can choose anything: "Advanced system settings", "Protection". The main thing is to get into this tab.

Check the box next to: “Allow connection” and go to the “Advanced” section if you want to select users who will be allowed to connect, and also indicate the period during which it can be valid. In fact, this is not necessary, but if you really want ...
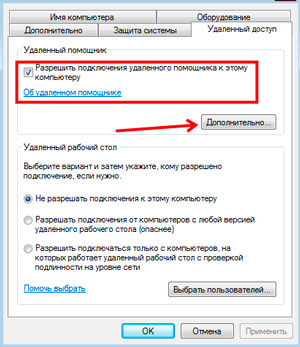
Now let's allow connection with any version of the desktop.

Let's add a user who is allowed to intrusion. As you can see, without your knowledge, no one will get to him.
Although, frankly, the protection is not so strong. Though put these values, though is not present. Allow access or block.
It's like a door. If a professional scammer or a very persistent person who needs to hack into the system wants to get into you, then no “protection” will help. Beginners will not cope even with a wooden gate on a barn lock.

At the other end of the wire, a person will only have to find the “Standard” heading in the “Start” menu, and then “Remote connection”.

In the menu that appears, you need to enter the name of the computer, then you're done.

If you have Windows XP, then I will advise you this lesson. Here you will be shown how to establish a connection with another computer over IP.
An easier way to connect from any device
I like the second way better. It is incredibly simple, convenient and free. To connect to another computer, phone or tablet, you will need to download and connect the TeamViewer program.
Its advantage lies in the fact that access to the computer is carried out only when the program is turned on, and the desktop at the same time throws off the wallpaper and fills with black. The appearance of a fraudster will not remain unnoticed.
An easy way to open access to a computer for a phone
If you want to see your laptop desktop on your phone, then you will need to download TeamViewer on your computer anyway.
We go to official site and download.

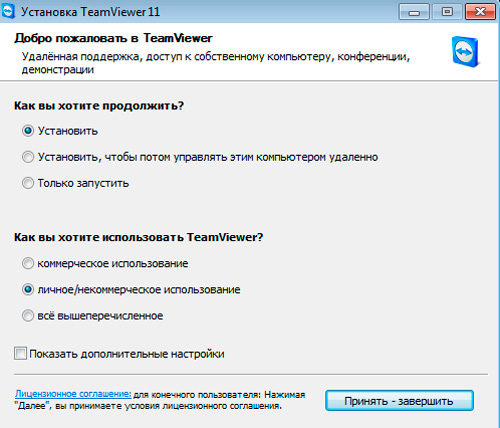
Download and run the utility. Be sure to set it to non-commercial use so you don't have to pay.
After installation, a welcome tutorial page awaits you.

On the left is your identification number and password for the current session. The latter is constantly changing. This is for your safety. On the left, you will need to enter the partner's ID in order to connect to their desktop. We will return to this later.

In principle, if you have two computers with the program installed, then you can work right now. For this there is everything you need.
Connecting from your phone or tablet
If you go to Google Play, you will find a whole bunch of TeamViewer apps, which one should you choose?
If you just want to have access to a computer from Android, then you will need the second one in the issue. In this case, you will not be assigned an ID and access to the phone or tablet will be denied. If you need it, then for this you will have to download another extension. About it a little later, because through it you will not be able to view the computer screen.

Download "TeamViewer - Remote Access" and install.

This window is waiting for you. Click "Continue" in the upper right corner.

Now enter the ID that you had specified when entering the program from a computer. To find it, you can simply open the application again and look at the numbers.

Now enter the password in the window that appears.

Again, you are taught how to use the extension.

Ready. Login completed.

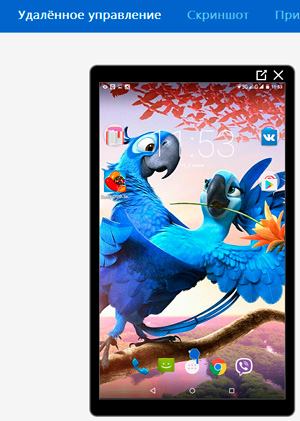
You can rotate the screen for better viewing.

You can control all computer functions directly from the screen of your mobile device.
We create a personal account and why it is needed
In order not to enter each time, you will need a personal account. Now I will show you how to create it, and then we will move on to a more interesting and important question - how to view a tablet from a laptop.
Go to the "Computers" section and click "Register".

Enter your name, password and address. Convince the system that you are not a robot. It's very simple.

Wait for the letter to arrive in the mail and follow the link. You can do it from a computer. For convenience, immediately change the language to Russian.

Now you can add your contacts, but wait, you don't know the phone ID yet.

By the way, a very important point with which I had to dig deeper for a very long time. In the application, when you enter the "Computers" section, you are asked to provide a name and password. Remember, you entered it when registering? Now, what they really need is an email address from you. Until you insert it exactly, no one will open additional opportunities for you.
A small but rather serious error in translation can cost several hours of hard work. Well, now let's move on to one of the main topics: how to view a mobile device.
How to access your phone from a computer
There are several applications. You can see the difference at the top of the logo. In some cases, a QS icon will be inserted. This is what we need.

In my case, I will not be able to control the device, only viewing is available to me. I can only show where to click and what to pay attention to. This is called demo mode.
This is due to the brand of my phone and a powerful security system that TimWeaver failed to crack. If you need access to management, install the application that was created for your device and you will not have such problems.
If you have a Samsung, then the TeamViewer version is also suitable for Samsung, there are similar ones for Lenovo, HTC, LG, ZTE, Prestigio and many others.
There is also a simple QS version designed for everyone. Downloading.

Here is the app I need. And when I opened it, they gave me a number.

I go into the program from a laptop and insert the ID on the right. Click "Connect to partner".

Above is an extensive menu, which has the possibility of remote control.

In my case, no management was possible, but the extension is quite useful anyway.
On a note. I often need screenshots from my phone to write blog articles. And I already told you, and use Yandex Disk for this. This is the one I used to transfer a large number of photos, but now I will start connecting to the screen with TeamViewer and taking screenshots from the laptop.
By the way, speaking of a remote connection, I cannot but recommend how to protect your computer book . In fact, its advantage is far from defense stories. I don't like Panda or McAfee. I am with both hands NOD32 . Download, you won't regret it.
However, there is a lot of useful information here about operating system crashes, hardware failures, stories about how to tell a worm from a Trojan, and where we catch viruses. You'll learn what to do to deal with resource conflicts, speed up your hard drive, repair your motherboard, roll back drivers, and more.

OK it's all over Now. If this information was useful to you, subscribe to the newsletter and learn more about life and work on the Internet.
Until we meet again and good luck in your endeavors.